

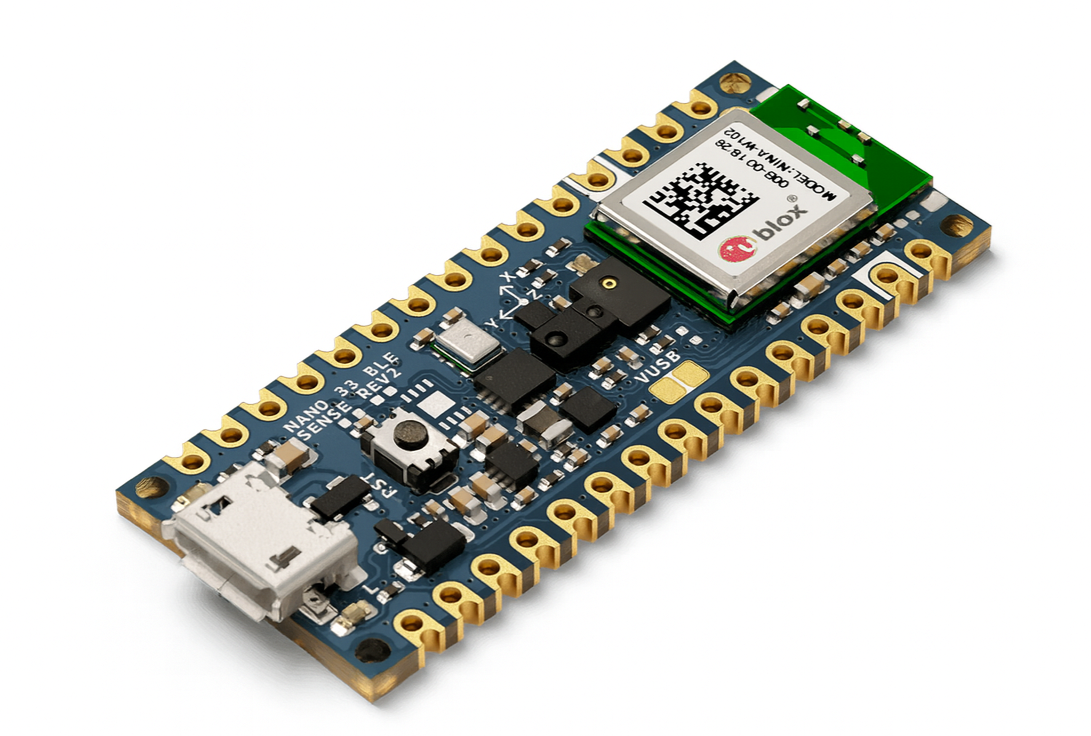
The Arduino Nano 33 BLE Sense Rev2 is one of the most powerful boards in the Arduino Nano family. It keeps the compact Nano form factor, adds Bluetooth® Low Energy (BLE 5), and integrates multiple onboard sensors for motion, sound, light, colour, and environmental data.
Powered by the u-blox NINA-B306 module with the Nordic nRF52840 MCU (Cortex-M4F @ 64 MHz), this board is perfect for IoT, wearables, and TinyML (machine learning at the edge).
If you’ve used the classic Arduino Nano, think of this as its smarter sibling—faster, wireless, and sensor-packed.
Arduino Nano 33 BLE Sense Rev2 Guide for Beginners
This guide covers everything you need to start working with the Nano 33 BLE Sense Rev2:
What is the board, and what makes it unique?
Technical specifications and onboard sensors.
How to set it up in the Arduino IDE 2.
Upload your first sketch (Blink).
Quick sensor test.
Example TinyML applications.
Introducing the Arduino Nano 33 BLE Sense Rev2
The Nano 33 BLE Sense Rev2 is built on the Nordic nRF52840 (inside the NINA-B306 module) and includes Bluetooth 5 Low Energy for wireless communication.
What makes it stand out:
Compact size: Same breadboard-friendly Nano footprint.
Low power consumption: Ideal for portable and battery-powered projects.
All-in-one sensing: Motion, sound, light, colour, temperature, humidity, and pressure.
BLE connectivity: Communicate wirelessly with smartphones, PCs, or IoT hubs.
It’s an all-in-one development board that eliminates the need for extra sensor modules when starting with IoT or ML projects.
Arduino Nano 33 BLE Sense Rev2 Specifications
Microcontroller: Nordic nRF52840 ARM® Cortex®-M4 @ 64 MHz
Flash / SRAM: 1 MB / 256 KB
Connectivity: Bluetooth® 5.0 Low Energy (via u-blox NINA-B306)
Operating Voltage: 3.3V ( All I/O pins are 3.3V only)
Form Factor: Nano (45 × 18 mm, breadboard-friendly)
Digital I/O Pins: 14 (PWM on D3, D5, D6, D9, D10)
Analog Inputs: 8 (12-bit ADC, up to 200 ksps)
Interfaces: 1× UART, 1× SPI, 1× I²C
USB: Native USB (via nRF52840)
Onboard Sensors (Rev2)
IMU (9-axis): BMI270 (6-axis accel/gyro) + BMM150 (3-axis magnetometer)
Barometer / Temperature: LPS22HB
Humidity / Temperature: HS3003
Gesture / Light / Proximity / Colour: APDS-9960
Microphone: MP34DT06 MEMS (PDM)
Note: Rev2 uses HS3003 + BMI270/BMM150, while Rev1 had HTS221 + LSM9DS1.
In this guide, we’ll walk through the key features, setup process, and a first test project to get you started.
What’s New in Rev2?
- Upgraded sensors → better accuracy and Arduino library support.
- Improved power regulation → more stable 3.3V operation.
- Bootloader recovery → double-tap RESET to recover if uploads fail.
- Same Nano form factor → fully breadboard-compatible
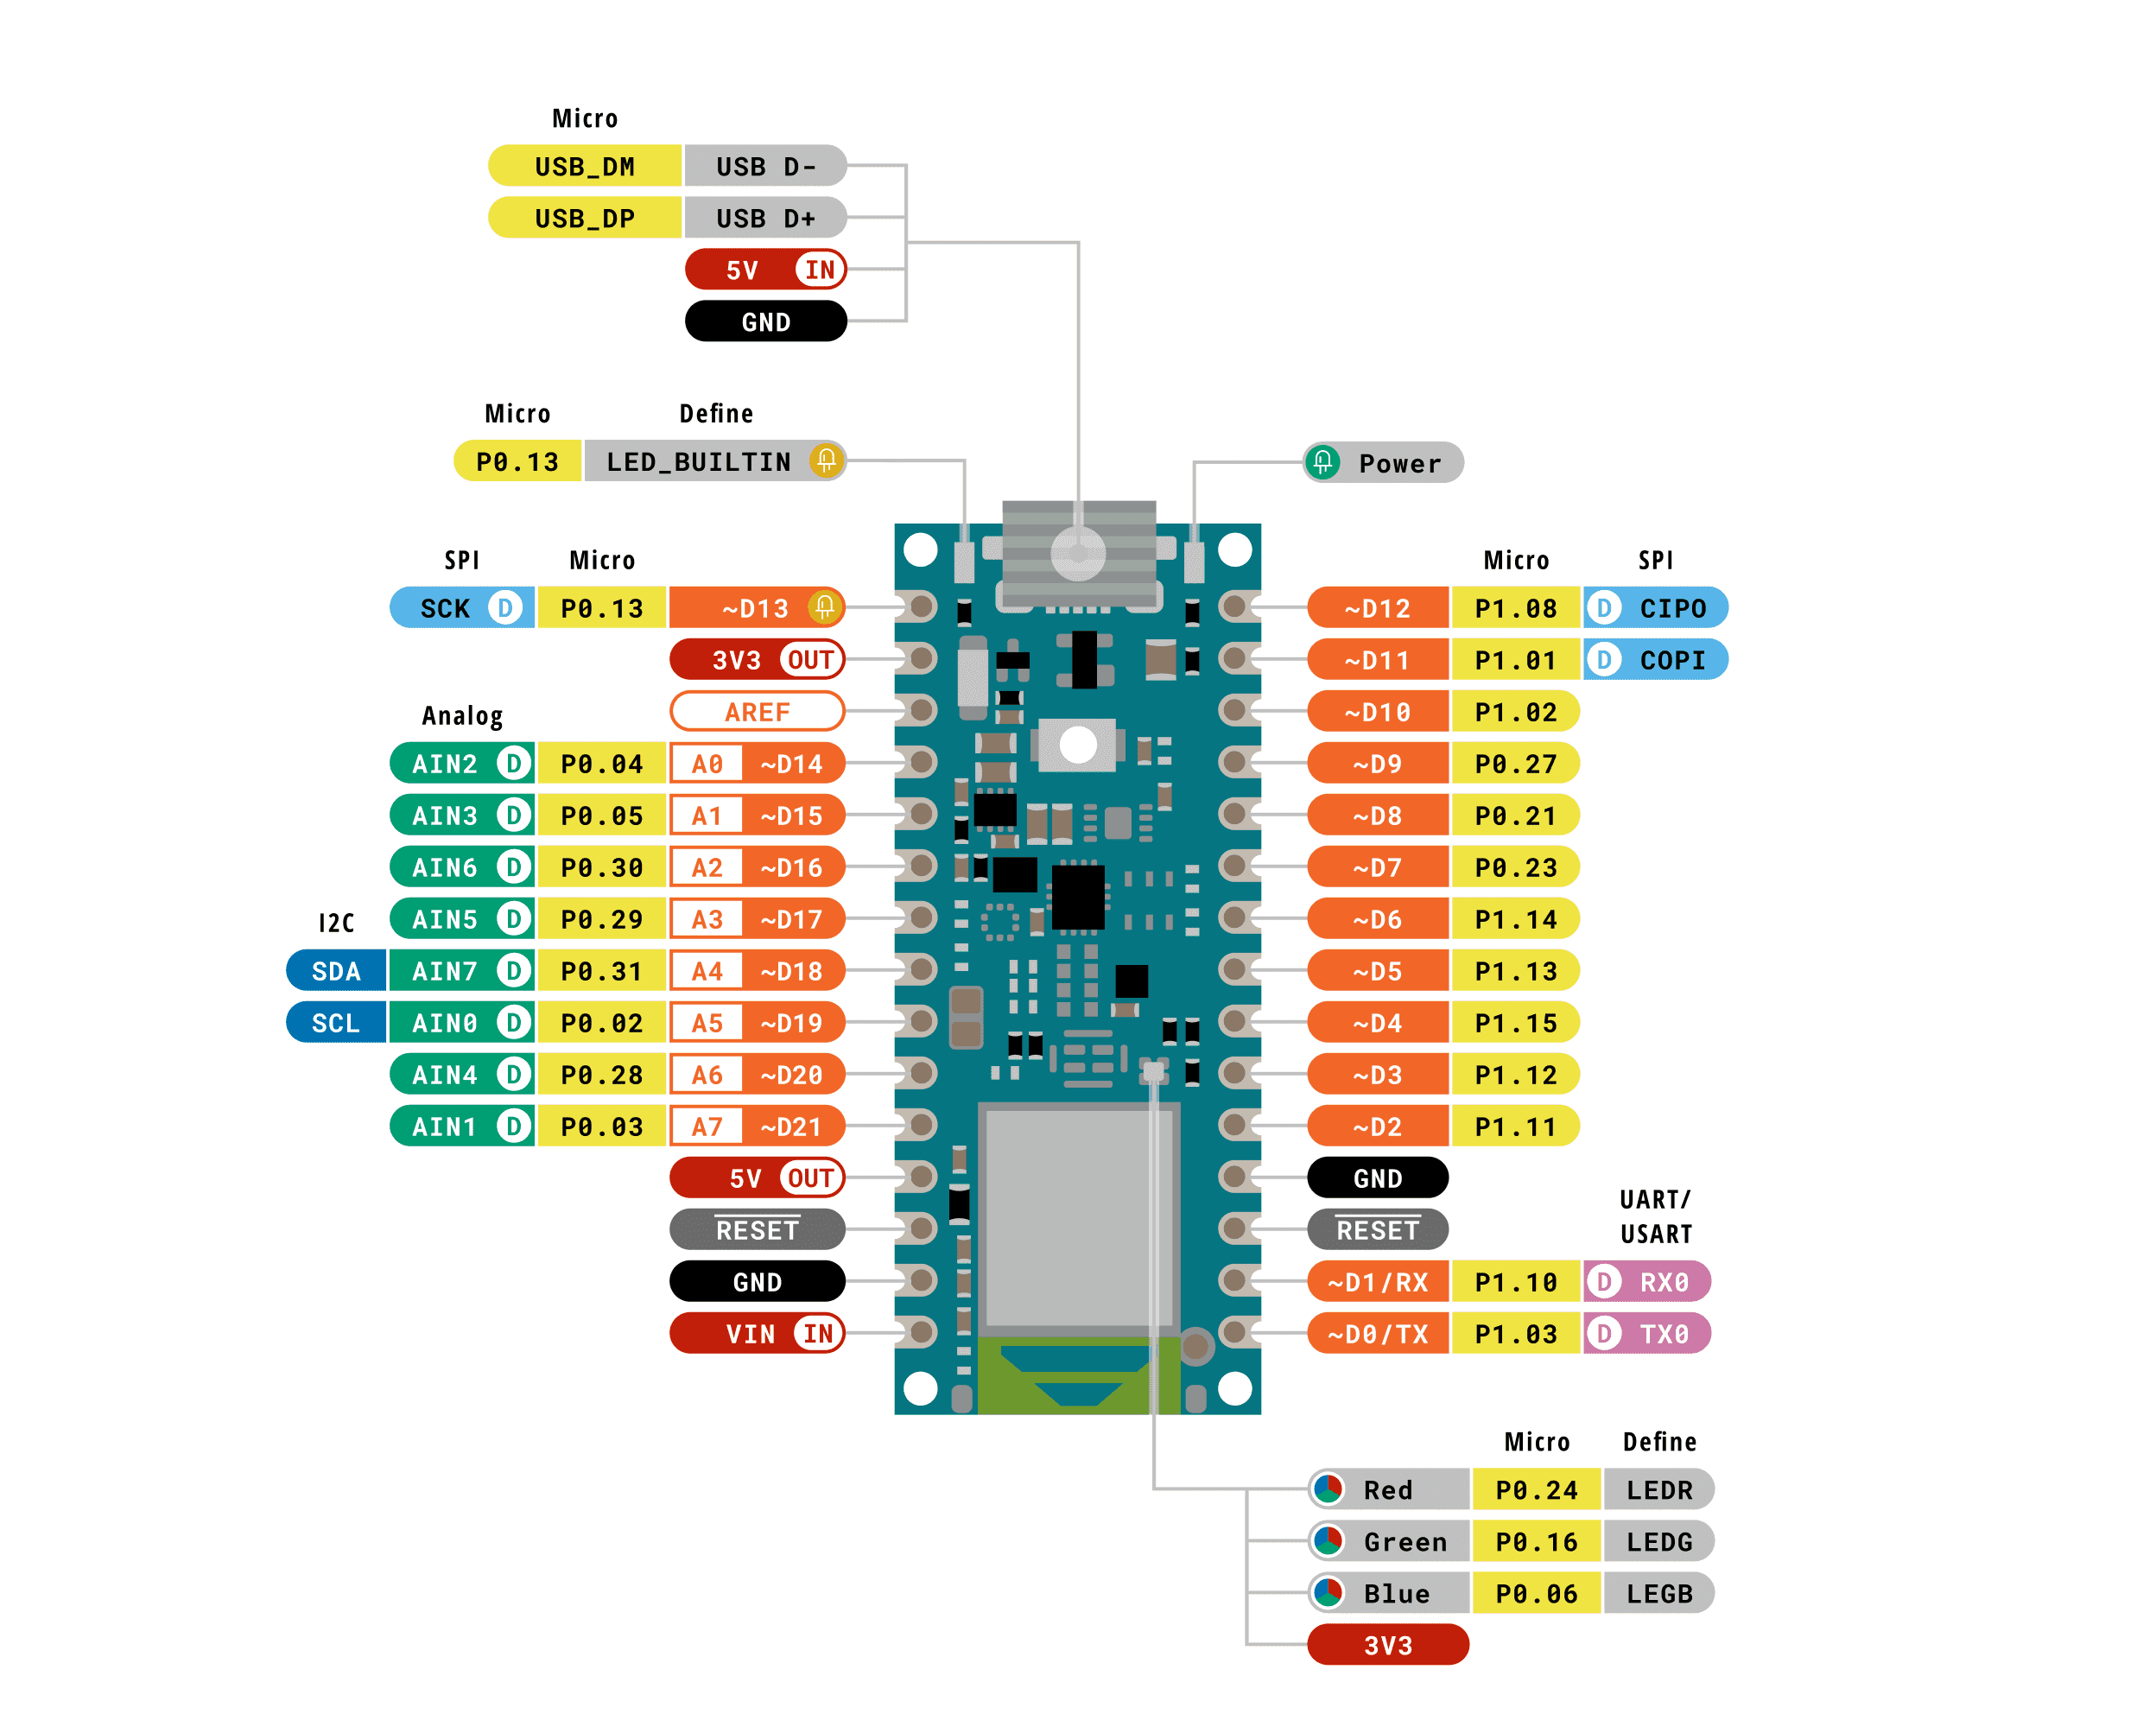
Arduino Nano 33 BLE Sense Rev2 Pinout
This board uses the familiar Nano footprint but packs more features thanks to the Nordic nRF52840 and the NINA‑B306 module. Let’s walk through the main pin groups and what makes them valuable:
| Pin Group | Location | Notes |
|---|---|---|
| Digital I/O (D0–D13) | Both edges | General-purpose, some support PWM |
| Analog In (A0–A7) | Left side | 12-bit ADC inputs |
| I²C (SDA, SCL) | A4, A5 | Internal pull-ups, avoid using as an analog |
| SPI | D11 (MOSI), D12 (MISO), D13 (SCK) | Standard SPI pins |
| UART (TX/RX) | Right side | Serial communication |
| Power (3.3 V, 5 V) | Top/bottom pads | 5 V needs a solder jumper; 3.3 V for sensors and logic |
| GND | Several pins | Ground for circuits |
| Reset / AREF | Left edge | For reset and analog ref calibration |
| SWD Debug | Under module | For advanced programming/debugging it’s Great for TinyML |

One of the biggest appeals of the Nano 33 BLE Sense Rev2 is its compatibility with TinyML frameworks like TensorFlow Lite, Edge Impulse, and SensiML. Because it has so many sensors already built in, you can start collecting training data immediately.
The Cortex-M4F chip has a floating-point unit, which speeds up DSP and machine learning inference, making it suitable for always-on applications such as keyword spotting or anomaly detection. You can read this tutorial on Introduction to Machine Learning & TinyML
Example TinyML projects:
Gesture recognition with the IMU.
Wake-word detection with the microphone.
Environmental anomaly alerts (pressure, humidity).
Nano 33 BLE Sense Rev2 Works smoothly with TensorFlow Lite, Edge Impulse, SensiML, and Arduino libraries/examples—short path from data → model → deployment.
Setting Up the Arduino Nano 33 BLE Sense. Let’s
prepare the board for use with the Arduino IDE. Follow these steps, and you’ll be lighting an LED before you know it!
Step 1: Install Arduino IDE
Download Arduino IDE 2.x for your OS (Windows 10+, macOS 10.15+, Linux 64-bit), install and open it.
Step 2: Install Board Package
- Open Tools → Board → Boards Manager…. then Search for Arduino Mbed OS Nano Boards.
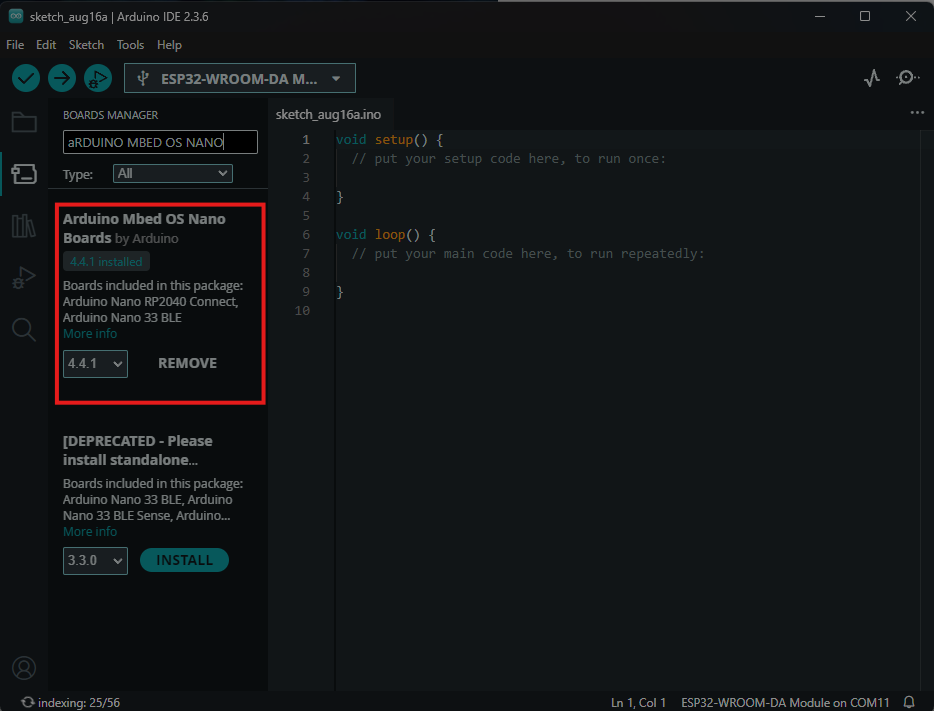
Click Install.
Step 3: Select the Board & Port
Tools → Board → Arduino Nano 33 BLE Sense Rev2.
Tools → Port → choose your board (COMx on Windows, /dev/ttyACMx on Linux).
First Test: Blink the Onboard. Let’s
make everything good, simple Blink project: Go to File → Examples → 01. Basics → Blink.
Or you can use this code.
- 12345678910111213// the setup function runs once when you press reset or power the boardvoid setup() {// initialize digital pin LED_BUILTIN as an output.pinMode(LED_BUILTIN, OUTPUT);}// the loop function runs over and over again forevervoid loop() {digitalWrite(LED_BUILTIN, HIGH); // turn the LED on (HIGH is the voltage level)delay(1000); // wait for a seconddigitalWrite(LED_BUILTIN, LOW); // turn the LED off by making the voltage LOWdelay(1000); // wait for a second}
Hit the Upload button. Once the upload finishes, the onboard LED should start blinking every second—your board is ready!
Reading Onboard Sensors with Arduino Nano 33 BLE Sense Rev2
The Arduino Nano 33 BLE Sense Rev2 packs multiple sensors on a tiny board. Everything is built in, so you don’t need extra modules to get motion, environmental, and gesture Sensors. Let’s go step by step and try each sensor.
Make sure you’ve installed these libraries in Arduino IDE → Library Manager:
Arduino_HS300xArduino_LPS22HBArduino_BMI270_BMM150Arduino_APDS9960
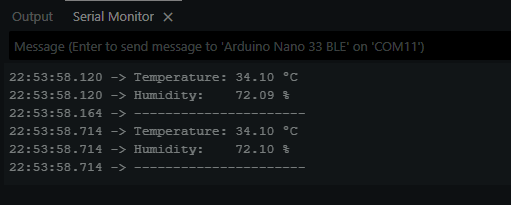
Nano 33 BLE Sense Temperature & Humidity (HS3003)
1 2 3 4 5 6 7 8 9 10 11 12 13 14 15 16 17 18 19 20 21 22 23 24 | #include <Arduino_HS300x.h> void setup() { Serial.begin(115200); while (!Serial); if (!HS300x.begin()) { Serial.println("HS3003 init failed!"); while (1); } delay(150); } void loop() { float t = HS300x.readTemperature(); // °C float h = HS300x.readHumidity(); // %RH Serial.print("Temperature: "); Serial.print(t, 2); Serial.println(" °C"); Serial.print("Humidity: "); Serial.print(h, 2); Serial.println(" %"); Serial.println("----------------------"); delay(500); } |
This sensor measures room temperature and relative humidity. To see the results, open the Serial Monitor at 115200 baud.
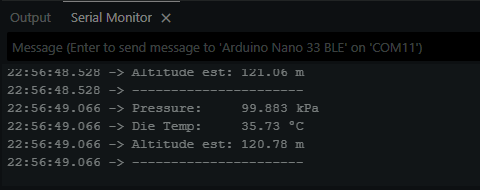
Nano 33 BLE Sense Pressure & Altitude (LPS22HB)
1 2 3 4 5 6 7 8 9 10 11 12 13 14 15 16 17 18 19 20 21 22 23 24 25 26 27 28 29 30 | #include <Arduino_LPS22HB.h> #include <math.h> void setup() { Serial.begin(115200); while (!Serial); if (!BARO.begin()) { Serial.println("LPS22HB init failed!"); while (1); } delay(150); } void loop() { float p_kPa = BARO.readPressure(); // kPa float t_die = BARO.readTemperature(); // °C (sensor die) float p_hPa = p_kPa * 10.0f; // hPa // ISA altitude (sea-level = 1013.25 hPa) float altitude_m = 44330.0f * (1.0f - powf(p_hPa / 1013.25f, 0.1902949572f)); Serial.print("Pressure: "); Serial.print(p_kPa, 3); Serial.println(" kPa"); Serial.print("Die Temp: "); Serial.print(t_die, 2); Serial.println(" °C"); Serial.print("Altitude est: "); Serial.print(altitude_m, 2); Serial.println(" m"); Serial.println("----------------------"); delay(500); } |
The pressure sensor can also estimate altitude above sea level using the standard atmosphere formula.
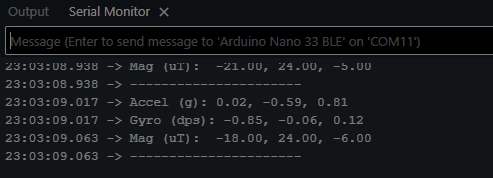
Nano 33 BLE Sense Motion Sensing (BMI270 + BMM150 IMU)
1 2 3 4 5 6 7 8 9 10 11 12 13 14 15 16 17 18 19 20 21 22 23 24 25 26 27 28 29 30 31 32 33 34 35 36 37 38 39 40 41 | #include <Arduino_BMI270_BMM150.h> void setup() { Serial.begin(115200); while (!Serial); if (!IMU.begin()) { Serial.println("IMU init failed!"); while (1); } delay(150); } void loop() { float ax, ay, az, gx, gy, gz, mx, my, mz; if (IMU.accelerationAvailable()) { IMU.readAcceleration(ax, ay, az); // g Serial.print("Accel (g): "); Serial.print(ax, 2); Serial.print(", "); Serial.print(ay, 2); Serial.print(", "); Serial.println(az, 2); } if (IMU.gyroscopeAvailable()) { IMU.readGyroscope(gx, gy, gz); // dps Serial.print("Gyro (dps): "); Serial.print(gx, 2); Serial.print(", "); Serial.print(gy, 2); Serial.print(", "); Serial.println(gz, 2); } if (IMU.magneticFieldAvailable()) { IMU.readMagneticField(mx, my, mz); // uT Serial.print("Mag (uT): "); Serial.print(mx, 2); Serial.print(", "); Serial.print(my, 2); Serial.print(", "); Serial.println(mz, 2); } Serial.println("----------------------"); delay(100); } |
This 9-axis IMU combines accelerometer, gyroscope, and magnetometer. Perfect for gesture detection, orientation, or TinyML projects
Nano 33 BLE Sense Gesture Detection (APDS9960)
1 2 3 4 5 6 7 8 9 10 11 12 13 14 15 16 17 18 19 20 21 22 23 24 25 26 27 28 29 30 31 32 33 34 35 36 37 38 39 40 41 42 43 44 45 46 47 48 49 50 51 52 53 54 55 56 57 58 59 60 61 62 63 64 65 66 67 68 69 70 71 72 73 74 75 76 77 78 79 80 81 82 | /* APDS9960 - Gesture Sensor (Arduino Nano 33 BLE Sense / Rev2) Detects gestures and lights LEDs: UP -> RED DOWN -> GREEN LEFT -> BLUE RIGHT -> BUILTIN LED */ #include <Arduino_APDS9960.h> void setup() { Serial.begin(115200); while (!Serial); // Onboard LEDs (active LOW for the RGB on Nano 33) pinMode(LED_BUILTIN, OUTPUT); pinMode(LEDR, OUTPUT); pinMode(LEDG, OUTPUT); pinMode(LEDB, OUTPUT); // Turn OFF RGB (HIGH = off) digitalWrite(LEDR, HIGH); digitalWrite(LEDG, HIGH); digitalWrite(LEDB, HIGH); digitalWrite(LED_BUILTIN, LOW); if (!APDS.begin()) { Serial.println("Error initializing APDS9960 sensor!"); while (1); } // 1..100 (higher = more sensitive, but may be less accurate) APDS.setGestureSensitivity(80); Serial.println("Detecting gestures..."); } void loop() { if (APDS.gestureAvailable()) { int gesture = APDS.readGesture(); switch (gesture) { case GESTURE_UP: Serial.println("Detected UP gesture"); digitalWrite(LEDR, LOW); // ON delay(200); digitalWrite(LEDR, HIGH); // OFF break; case GESTURE_DOWN: Serial.println("Detected DOWN gesture"); digitalWrite(LEDG, LOW); delay(200); digitalWrite(LEDG, HIGH); break; case GESTURE_LEFT: Serial.println("Detected LEFT gesture"); digitalWrite(LEDB, LOW); delay(200); digitalWrite(LEDB, HIGH); break; case GESTURE_RIGHT: Serial.println("Detected RIGHT gesture"); digitalWrite(LED_BUILTIN, HIGH); delay(200); digitalWrite(LED_BUILTIN, LOW); break; default: // no-op break; } // small cooldown so one wave doesn't trigger several times delay(150); } // short poll interval delay(10); } |
Wave your hand above the sensor. The onboard LEDs give feedback for UP, DOWN, LEFT, and RIGHT gestures.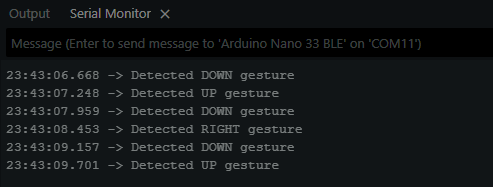
Conclusion
The Arduino Nano 33 BLE Sense Rev2 is a compact yet powerful board with built-in sensors and BLE connectivity. With just a few lines of code, you can read motion, environmental, and gesture data — no extra modules are required
")


")


