

Hi friends, I hope you all are fine today in this tutorial I have got very good projects for you. we will show you how to make a Raspberry Pi Pico-based Volume knob which means you can control the volume or brightness of your personal computer with a Rotary Encoder & Raspberry Pi Pico.
In this text, we’ll be discussing how to create a volume control knob using a Raspberry Pi Pico. This is a fairly simple project that can be completed in just a few minutes. You’ll need a few basic materials, including a Raspberry Pi Pico, a Rotary encoder, and some jumper wires.
To keep things simple, Instead of other microcontrollers, I will use a Raspberry pi pico board. Not only is the board small, but it is cheap! Normally I pick mine up from Amazon.com for less than $4 USD
Required Material
What you will be needing:
What is Raspberry Pi Pico?
Raspberry Pi Pico is a microcontroller board based on the RP2040 chip from the Raspberry Pi Foundation that costs just $4. The Pico has two main components: the RP2040 chip and The RP2040 chip is a powerful Cortex-M0+ processor. It has a lot of features such as – 256KB of on-chip RAM – 2MB of on-chip Flash memory – A USB controller – GPIO pins – ADC pins – PWM pins – I2C and SPI pins The USB controller is used to connect the Pico to a computer. Let’s get started!
we will install CircuitPython on Pico and use a rotary encoder to create a control knob for Windows that can be scaled, scrolled left/right, volume control, sleep, etc.
Circuit diagram
The circuit diagram is simple because there are only two parts, but I made it with Fritzing, so I will post it. On the circuit diagram.
The connections are done as per the circuit diagram.
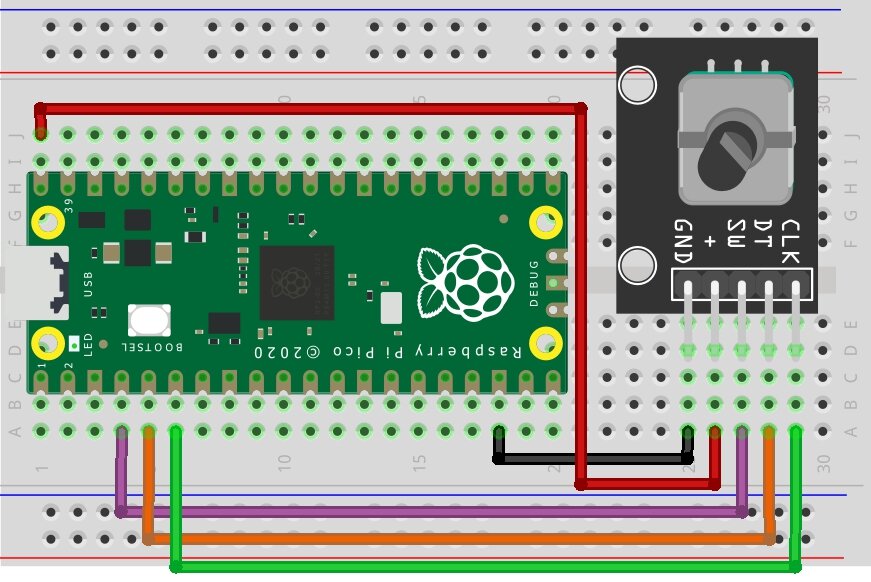
The power supply of the encoder is taken from Pico’s 5V.
Installing CircuitPython
CircuitPython is a programming language based on Python that makes it easy to program and interact with hardware. It is designed to be easy to use with beginner-friendly features and libraries that make it easy to get started with it.
This guide will show you How to set up a Raspberry Pi Pico and Code with CircuitPython on your Windows, Mac, or Linux computer.
Installing Libraries
Installing the Adafruit HID Library –
- Go to releases
- Download the zip (example: adafruit-circuitpython-hid-6.x-mpy-4.1.6.zip )
- extract zip
- copy the adafruit_hid from the lib folder in the extracted folder
- paste it to the lib folder in the Pico which will now be called CIRCUITRY

Before starting make sure your board’s lib folder has the adafruit_hid library folder copied over.
Code the Raspberry Pi Pico Knonb
Adafruit guides using the Mu editor for using your CircuitPython code with the Raspberry Pi Pico. You can get more info in this guide. Alternatively, you can use any text editor that saves files in pico. In this tutorial, I’m using Thonny IDE.
Setting up Thonny:
- Once you open Thonny go run> Select Interpreter
- and make sure it is selected to CircuitPython(generic)
- Type this command in the shell
help("modules")
If everything is working now you should see all the libraries that are already available.
CircuitPython Code
Copy the code below and paste it into Thonny IDE. Then, save it to your Raspberry Pi Pico as code.py
Note – This code is only for volume
import digitalio
import board
import usb_hid
from adafruit_hid.keyboard import Keyboard
from adafruit_hid.keycode import Keycode
from adafruit_hid.consumer_control import ConsumerControl
from adafruit_hid.consumer_control_code import ConsumerControlCode


CLK_PIN = board.GP4
DT_PIN = board.GP3
SW_PIN = board.GP2
clk_last = None
count = 0

keyboard = ConsumerControl(usb_hid.devices)

clk = digitalio.DigitalInOut(CLK_PIN)
clk.direction = digitalio.Direction.INPUT

dt = digitalio.DigitalInOut(DT_PIN)
dt.direction = digitalio.Direction.INPUT

sw = digitalio.DigitalInOut(SW_PIN)
sw.direction = digitalio.Direction.INPUT

def ccw():
    print("CCW")
    keyboard.send(ConsumerControlCode.VOLUME_DECREMENT)

def cw():
    print("CW")
    keyboard.send(ConsumerControlCode.VOLUME_INCREMENT)

while(1):
    clkState = clk.value
    if(clk_last !=  clkState):
        if(dt.value != clkState):
            cw()
        else:
            ccw()
    clk_last = clkState;
Note: To run any code on the raspberry pi Pico automatically on start-up in CircuitPython the file must be named code.py
# SPDX-FileCopyrightText: 2021 Tim C for Adafruit Industries
# SPDX-License-Identifier: MIT
import digitalio
import board
import usb_hid
import time
from adafruit_hid.keyboard import Keyboard
from adafruit_hid.mouse import Mouse
from adafruit_hid.keycode import Keycode
from adafruit_hid.consumer_control import ConsumerControl
from adafruit_hid.consumer_control_code import ConsumerControlCode

print(" Raspberry Pi Pico multi function knob (DiY Projects Lab) ")

SW_PIN = board.GP2
DT_PIN = board.GP3
CLK_PIN = board.GP4

clk_last = None
count = 0
totalMode = 3
currentMode = 0

cc = ConsumerControl(usb_hid.devices)
mouse = Mouse(usb_hid.devices)
keyboard = Keyboard(usb_hid.devices)


clk = digitalio.DigitalInOut(CLK_PIN)
clk.direction = digitalio.Direction.INPUT

dt = digitalio.DigitalInOut(DT_PIN)
dt.direction = digitalio.Direction.INPUT

sw = digitalio.DigitalInOut(SW_PIN)
sw.direction = digitalio.Direction.INPUT
sw.pull = digitalio.Pull.UP

def millis():
    return time.monotonic() * 1000

def ccw():
    print("CCW")

    if (currentMode == 0):    # Mac brightness down

        cc.send(ConsumerControlCode.BRIGHTNESS_DECREMENT)

    elif(currentMode ==1):    # Mac horizontal scroll right
        keyboard.press(Keycode.SHIFT)
        mouse.move(wheel=-1)
        keyboard.release(Keycode.SHIFT)

    elif(currentMode == 2):   # Volume decrement
        cc.send(ConsumerControlCode.VOLUME_DECREMENT)

def cw():
    print("CW")
    if (currentMode == 0):     # Windows brightness up
                  cc.send(ConsumerControlCode.BRIGHTNESS_INCREMENT)

    elif(currentMode ==1):     # Mac horizontal scroll left
        keyboard.press(Keycode.SHIFT)
        mouse.move(wheel=1)
        keyboard.release(Keycode.SHIFT)

    elif(currentMode == 2):     # Volume increment
        cc.send(ConsumerControlCode.VOLUME_INCREMENT)

def long_press():
    #Mac sleep: CMD + OPT + EJECT
    keyboard.press(Keycode.ALT, Keycode.COMMAND)
    cc.send(ConsumerControlCode.EJECT)
    keyboard.release_all()

while(1):
    clkState = clk.value
    if(clk_last !=  clkState):
        if(dt.value != clkState):
            cw()
        else:
            ccw()
    if (sw.value == 0):
        pressTime = millis()
        time.sleep(0.2)
        longPress = False
        while(sw.value == 0):
            if(millis() - pressTime > 1000 and not longPress):
                print("longPress")
                longPress = True
                long_press()


        if (not longPress):
            currentMode += 1
            currentMode %= totalMode
            print("Mode: " + str(currentMode))

    clk_last = clkState
Now, save the file. You can use any location and any name, but the filename should end with .py
- Next step: Config interpreter
- select CircuitPython as an interpreter
- And select the target board for Raspberry pi pico
- Press “Run” to begin executing the code
HID Keyboard Basics
If you want to modify the function and use it, This guide page has a great intro to CircuitPython HID Keyboard. and if you register many functions, the process will be difficult. For even more details, check out the documentation at https://circuitpython.readthedocs.io/projects/hid/en/latest/ which has all of the keycodes and media codes you can use.
Working
Done! easy right?
- Mode 1: Volume up / down
- Mode 2: Increase / Decrease screen brightness
- Mode 3: Horizontal scroll. Very useful when editing videos.
- Press and hold: Turn off the computer (Sleep)


1 Comment
Pingback: Rotary Encoder With Raspberry Pi Pico Using MicroPython