
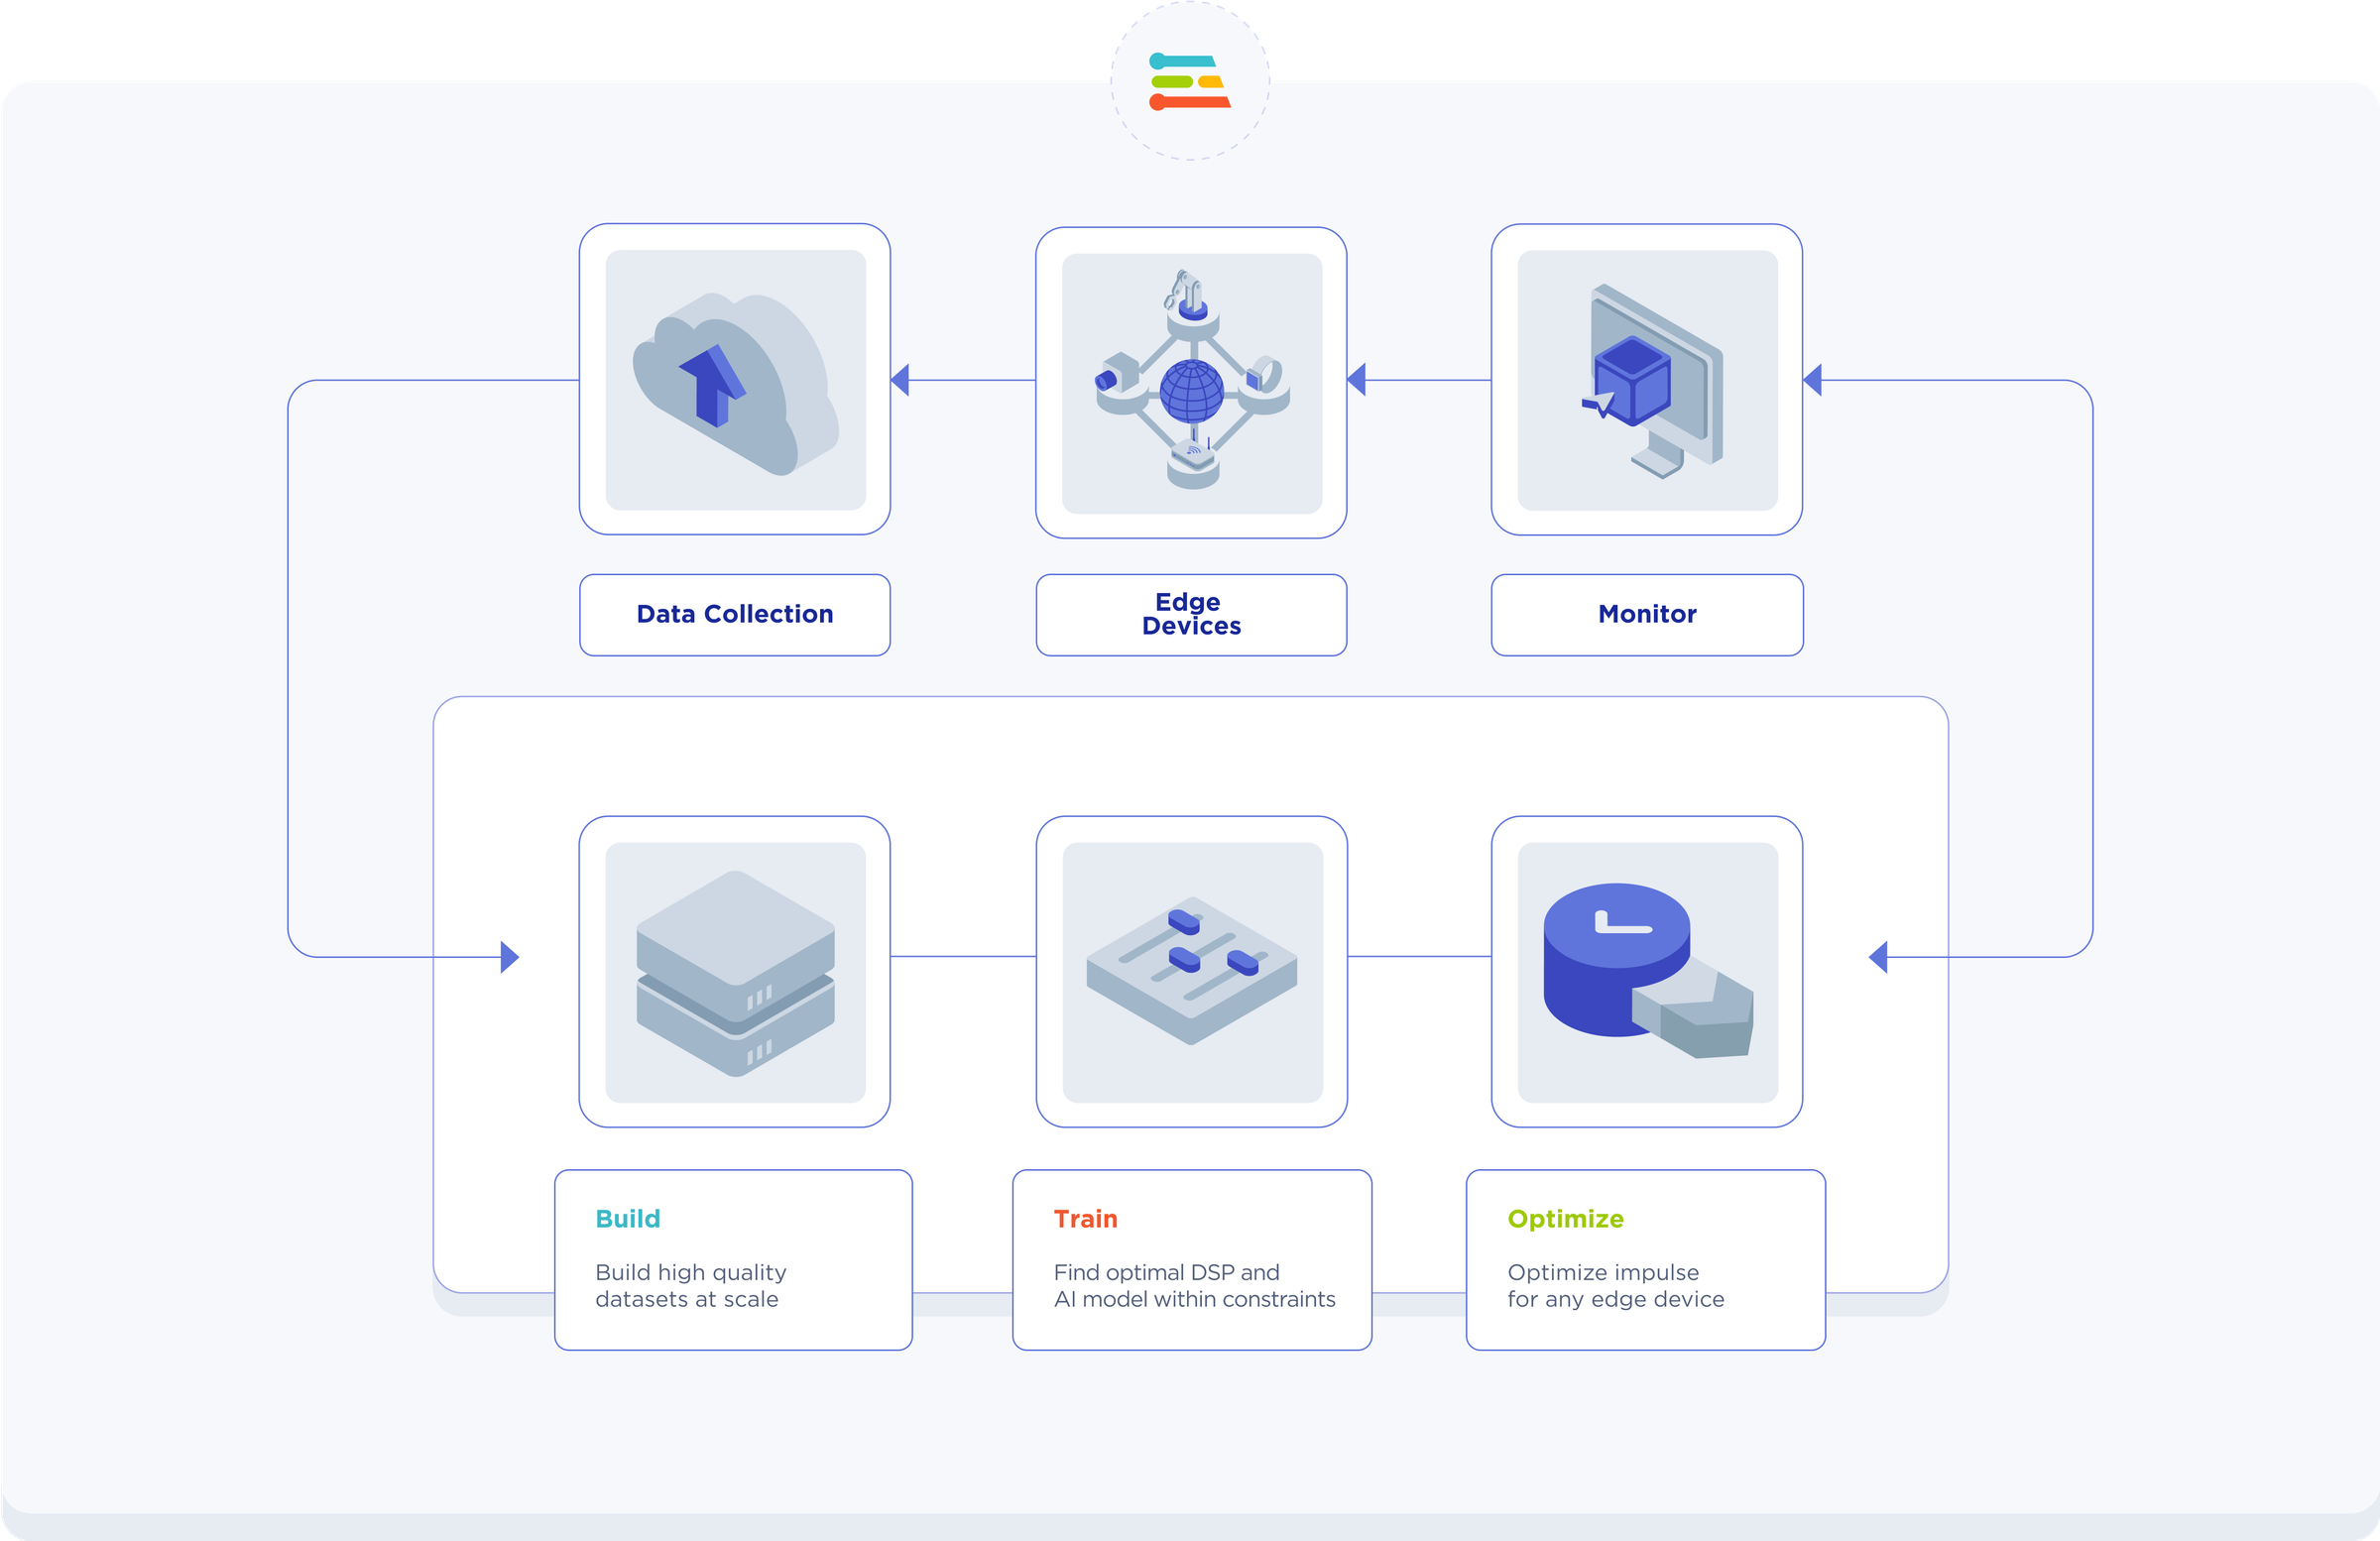
Edge Impulse is a developer platform for building and deploying ML models on edge devices—from tiny microcontrollers to powerful GPUs and industrial sensors. It covers the full workflow: collect data → design your Impulse (signal processing + ML) → evaluate on real hardware → deploy as an optimized C++/Arduino/WebAssembly library.
![]()
It provides an end-to-end pipeline to embedded hardware such as MCUs, IoT devices, smartphones, and industrial gateways. Instead of shipping all sensor data to the cloud (slow/expensive/power-hungry), Edge AI lets devices make decisions locally with low latency, low bandwidth, and better battery life.
This guide is a step-by-step tutorial for Windows 10/11 using the Arduino Nano 33 BLE Sense Rev2. Also, you can see Getting Started with the Arduino Nano 33 BLE Sense Rev.2
Why Edge Impulse?
Key Advantages
All-in-One Workflow
- Complete pipeline from data collection to deployment
- Integrated DSP features and AutoML (EON Tuner)
- Built-in training and evaluation tools
Beginner-Friendly, Expert-Capable
- Low-code UI for beginners
- Advanced options: custom DSP, BYOM (Bring Your Model), C++ SDKs
- Extensive documentation and community support
Universal Compatibility
- Runs on MCUs, CPUs, GPUs
- Supports Arduino, Zephyr, Linux, WebAssembly
- Cross-platform deployment
Rapid Prototyping
- Generates Arduino libraries automatically
- Quick sketch creation and testing
- Real-time performance monitoring
Common Use Cases
- Wearables: Sleep tracking, fitness monitoring
- Industrial IoT: Anomaly detection, predictive maintenance
- Smart Cities: Traffic counting, people detection
- Voice/Gesture: Wake-word detection, gesture recognition
- Environmental: Air quality monitoring, wildlife tracking
Instead of needing a graduate degree in data science
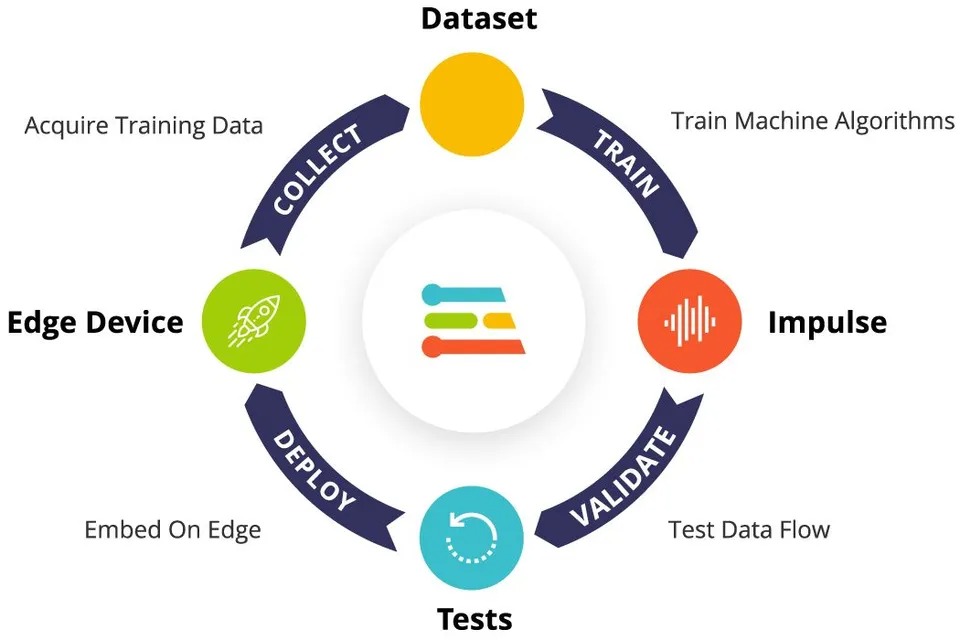
- Collect sensor data with a few clicks
- Train AI models without writing complex code
- Deploy everything back to your Arduino
- See it working in real-time
Hardware
Arduino Nano 33 BLE Sense Rev2
USB cable
Software
- Edge Impulse Account – studio.edgeimpulse.com
- Node.js (≥16, 22 LTS recommended) – with Tools for Native Modules
- Python 3 – add to PATH
- Edge Impulse CLI – installed via npm
- Arduino IDE or Arduino CLI – with Mbed OS Nano Boards core
Install Node.js + Python
For Node.js:
- Go to nodejs.org
- Download the LTS version (the green button)
- Run the installer – just keep clicking “Next”
- When it asks about “Tools for Native Modules,” say yes
- Restart your computer (seriously, this saves headaches later)
For Python:
- Go to python.org
- Download the latest version
- Important: Check the “Add Python to PATH” box during install
- Install it
Did it work? Open Command Prompt and type:
1 2 3 | node --version npm --version python --version |
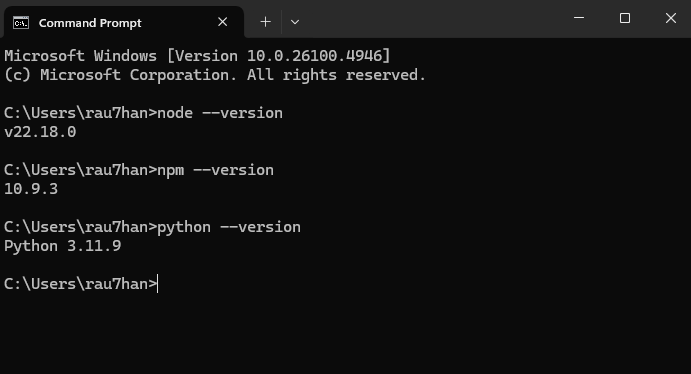
If you see version numbers, you’re golden. If not, something went wrong with the PATH setup.
The CLI includes tools like
edge-impulse-daemonto onboard devices and stream data, and a Data Forwarder for any serial‑speaking sensor.
Install Edge Impulse CLI on Windows
Now for the Edge Impulse command-line tools. These let your computer talk to both your Arduino and the Edge Impulse website.
1 2 3 4 | # install (requires Node.js) npm install -g edge-impulse-cli # verify edge-impulse-daemon --version |
This might take a few minutes. Don’t worry if it looks like it’s doing nothing – it’s downloading stuff in the background.
CLI Tools Included:
edge-impulse-daemon– Device onboarding and data streamingedge-impulse-data-forwarder– Custom serial sensor data uploadedge-impulse-uploader– Batch data upload utilities
Test it:
1 | edge-impulse-daemon --version |
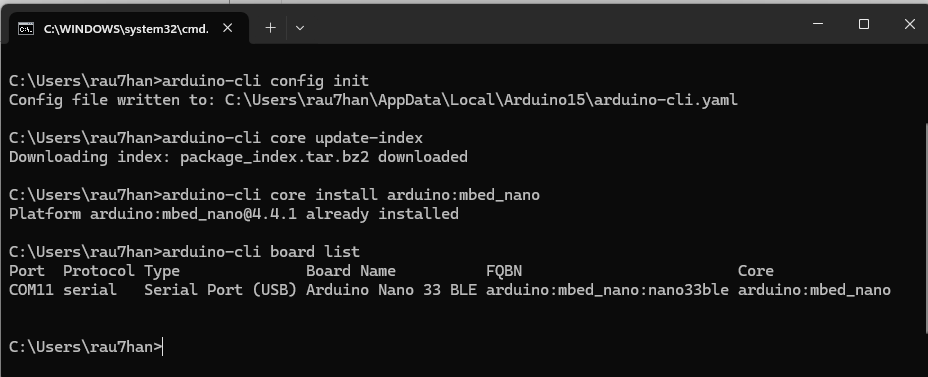
Install Arduino CLI
- Download arduino-cli.exe from the official Arduino documentation
- Create a folder like
C:\Arduino-CLI\and place the executable there - Add this folder to your system PATH:
- Open System Properties → Environment Variables
- Edit the PATH variable and add your Arduino CLI folder
- Restart the command prompt
1 2 3 4 5 6 7 8 9 10 11 | # Initialize configuration arduino-cli config init # Update board index arduino-cli core update-index # Install Arduino Nano board support arduino-cli core install arduino:mbed_nano # Verify board detection arduino-cli board list |
Check if your board is detected:
1 | arduino-cli board list |
With your Arduino plugged in, you should see it listed.
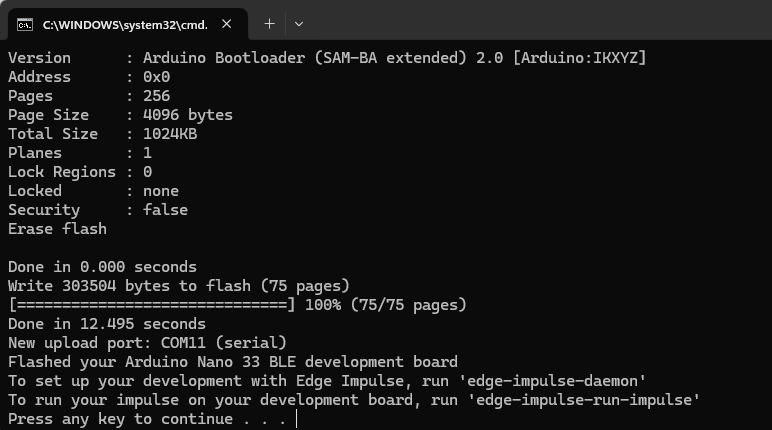
Flash Edge Impulse Firmware on Arduino Nano 33 BLE Sense Rev2
Edge Impulse provides ready-to-flash firmware for the BLE Sense/Rev2 that makes device pairing and data capture effortless and remote management from Studio. Download it from the Arduino tutorial page, unzip it, and run the flash script for your OS.
- Download it: Go to the Edge Impulse docs and find the Nano 33 BLE Sense Rev2 firmware.
- Unzip it
- Plug in your Arduino
- Run Flash Script: Execute the appropriate script for your OS:
- Windows:
flash_windows.bat - macOS:
flash_mac.command - Linux:
flash_linux.sh
- Windows:
- Wait (it takes about a minute)
- Press the reset button on your Arduino when it’s done
You’ll know it worked when the LED starts blinking in a pattern.
Tip: The EI firmware is optional but highly recommended. If you prefer to keep your custom sketch, you can still send data to Edge Impulse using the Data Forwarder over serial.
Create your Edge Impulse project.
Sign in to your Edge Impulse Studio account (or create a free account if you don’t have one).
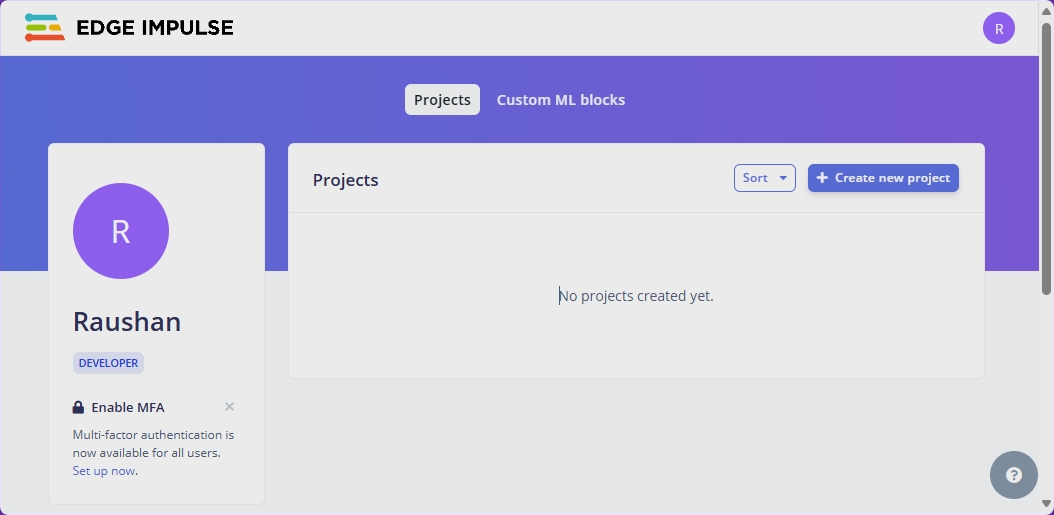
Create a new project (call it whatever you want)
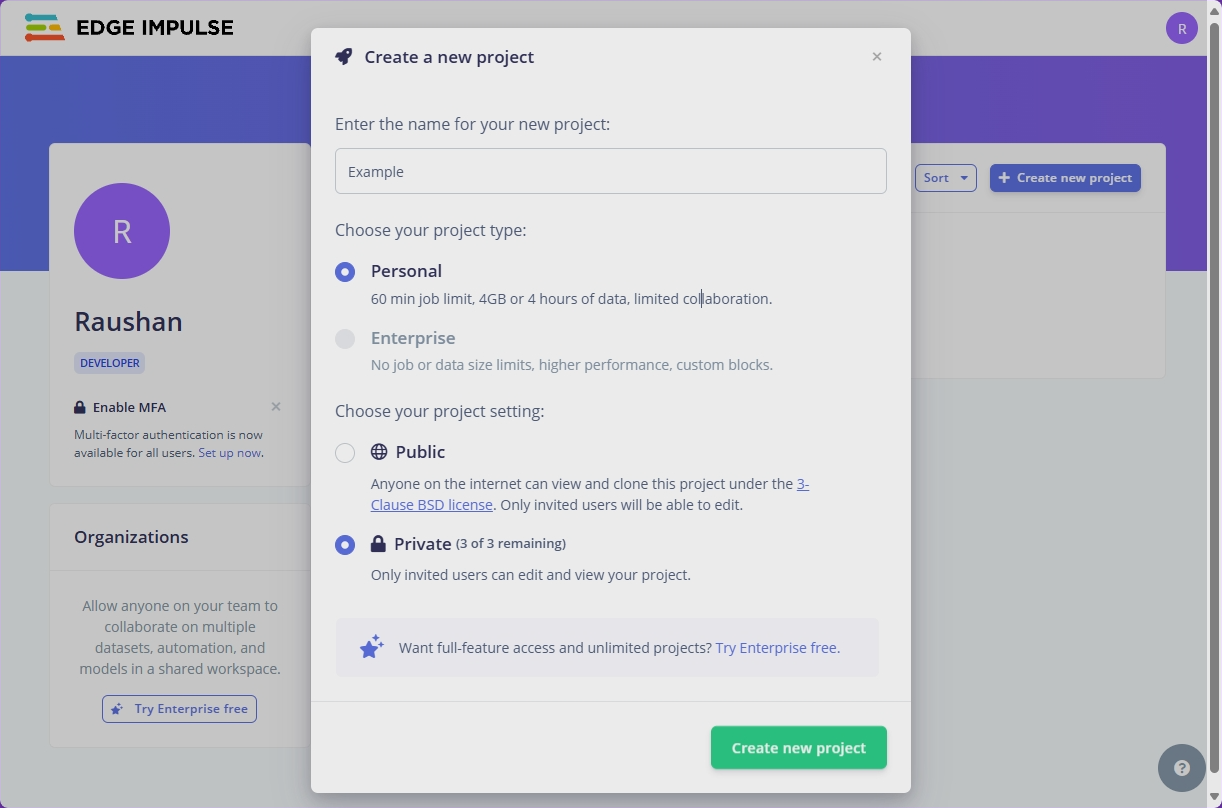
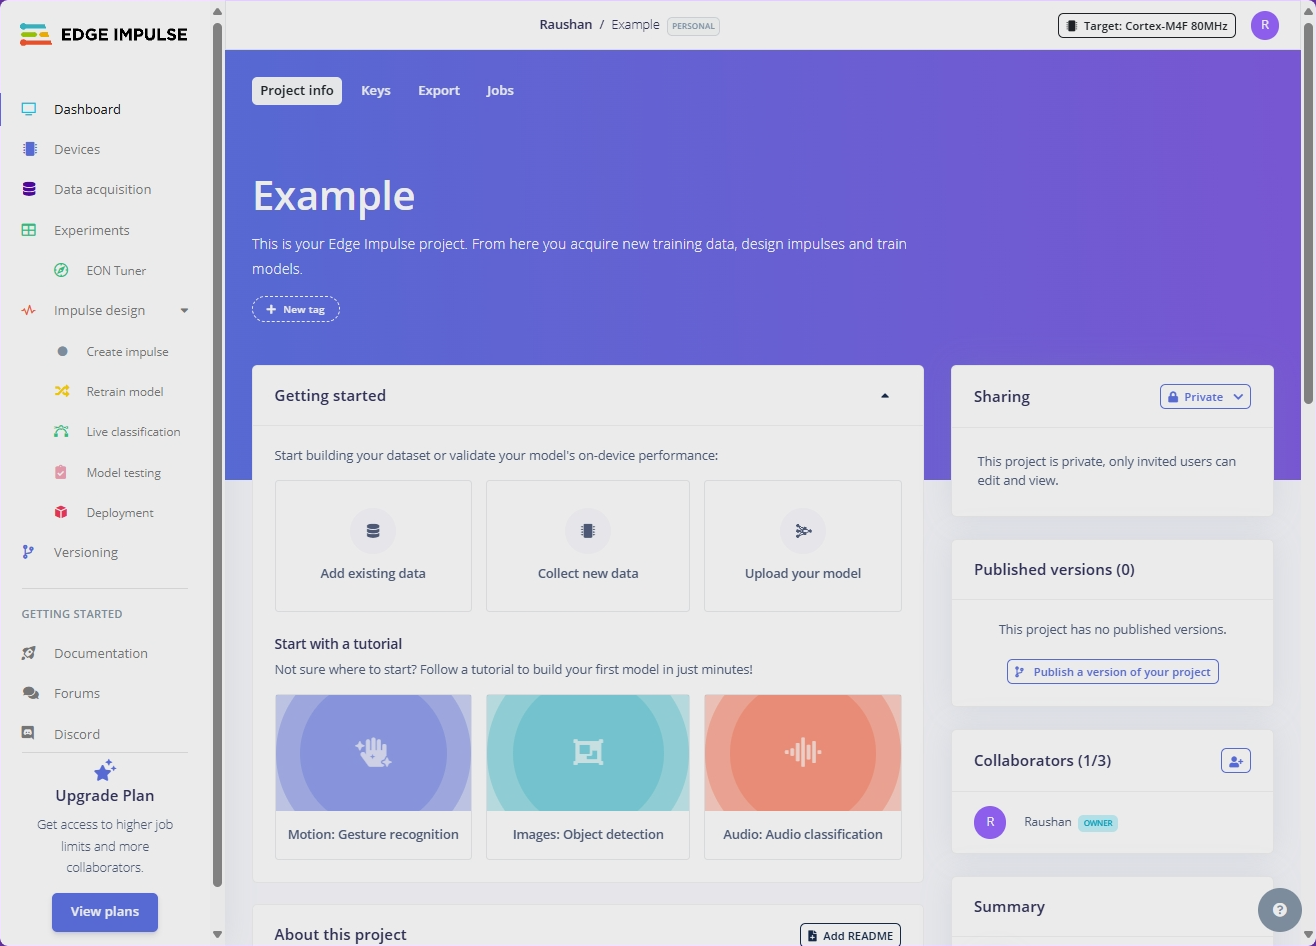
Once created, your new project will appear in the dashboard under Projects. From here, you can start collecting data, designing your Impulse, and training models — all within Edge Impulse Studio.
Connect your Arduino to your Edge Impulse project
- Make sure your Arduino is plugged in
- Open Command Prompt
- Run:
edge-impulse-daemon - Log in with your Edge Impulse account
- Pick your project from the list
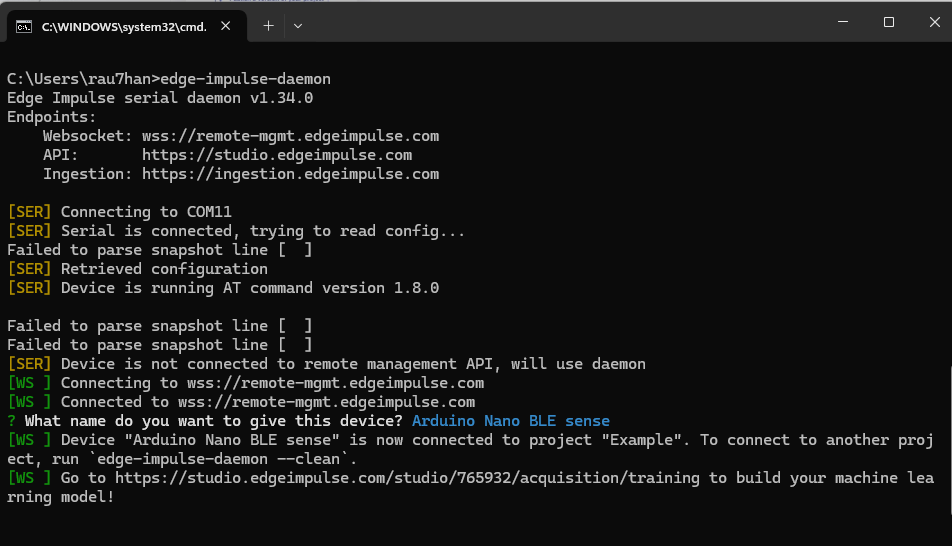
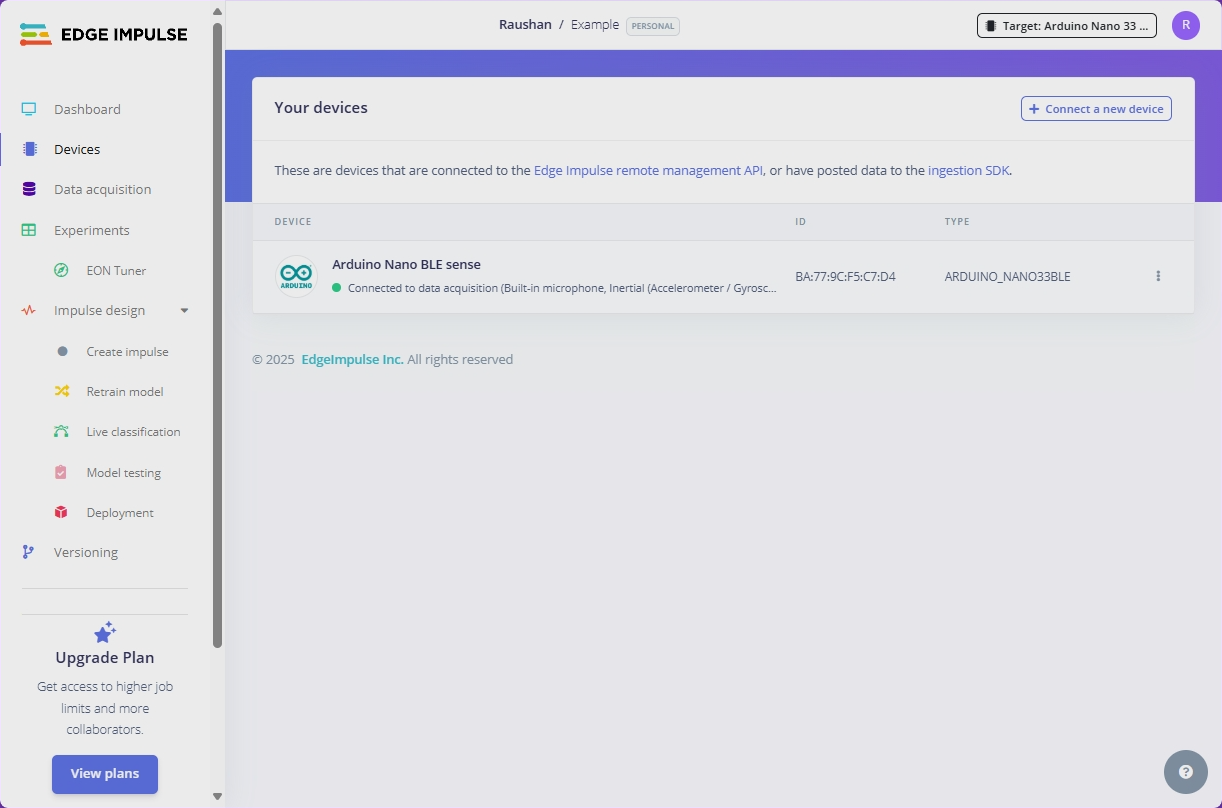
If everything worked, you should see your Arduino show up in the Edge Impulse Studio under “Devices.” The status should say “Connected” with a green dot.
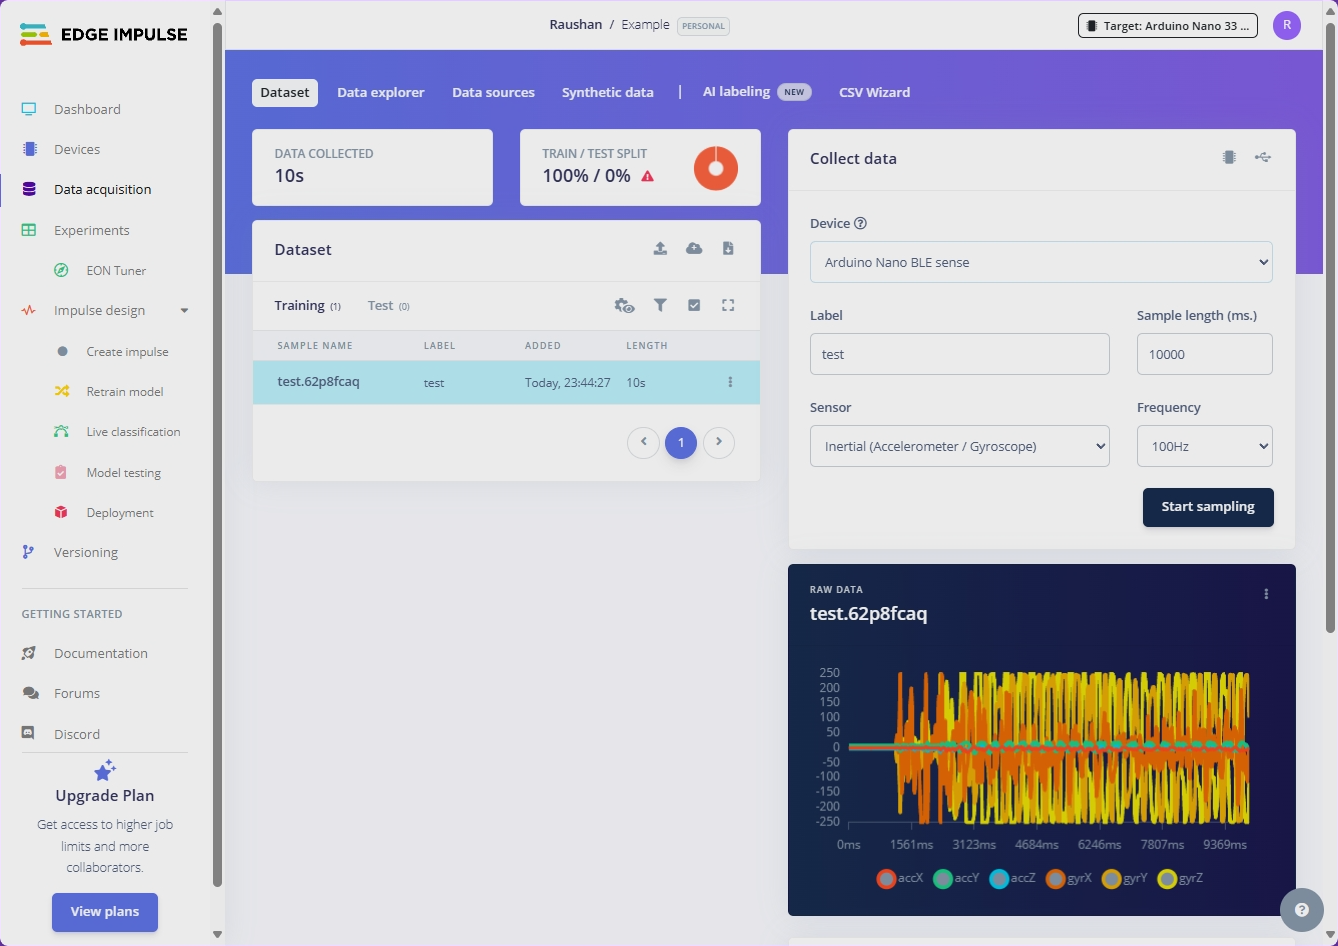
Testing Everything Works
Let’s make sure everything’s working:
- Go to Edge Impulse Studio
- Click on “Data acquisition“
- You should see live sensor data from your Arduino
- Try moving the board around – the numbers should change
Troubleshooting
Board not detected?
Make sure the correct USB cable is used. Try another port or runedge-impulse-daemon --clean.Timeout errors (e.g., COM12)?
Re-flash the Edge Impulse firmware and press RESET once after flashing.CLI not working?
Check Node.js (≥16) and Python installation. Runnode --versionandpython --versionto confirm.Small dataset?
Collect more varied data or use “noise”/“unknown” classes to improve accuracy.Model too big for device?
Enable the EON Compiler in Edge Impulse Studio to reduce RAM/flash usa
Now you’re ready to collect data, design your first Impulse, and deploy ML models on your Arduino Nano 33 BLE Sense Rev2. Next, try building a simple keyword spotting or gesture recognition project.
")


