
In this DIY guide, we’ll build a high-performance compact ESP32-based thermal camera using the MLX90640 Thermal Camera and a 1.8-inch ST7735 TFT display. This project creates a portable, responsive thermal camera with enhanced image quality, optimized frame rates, and accurate temperature readings.
The MLX90640 sensor consists of a 32×24 grid of thermopile elements that detect infrared heat radiation. The ESP32 reads this data over I2C, processes it, maps temperatures to a colour palette (like iron, rainbow, etc.), and displays it using the TFT screen.
Features
Real-time thermal image on TFT screen
Temperature range: -40°C to +300°C
32×24 IR resolution
ESP32 for high-speed processing
Low power consumption
Check out other Thermal Camera Projects
- MLX90640 Thermal Imaging Camera with Raspberry PI
- ESP8266 Thermal Imager Using AMG8833 Sensor
- Interfacing AMG8833 Thermal Camera Sensor With Raspberry PI
Required Hardware
To build this project, you’ll need:
- ESP32 board
- MLX90640 IR Thermal Camera module
- ST7735 1.8″ TFT Display
- Breadboard and jumper wires
Software Requirements
- Arduino IDE
- Required libraries:
- Adafruit_GFX
- Adafruit_ST7735
- Adafruit_MLX90640
What is a Thermal Imaging Camera & How Does It Work?
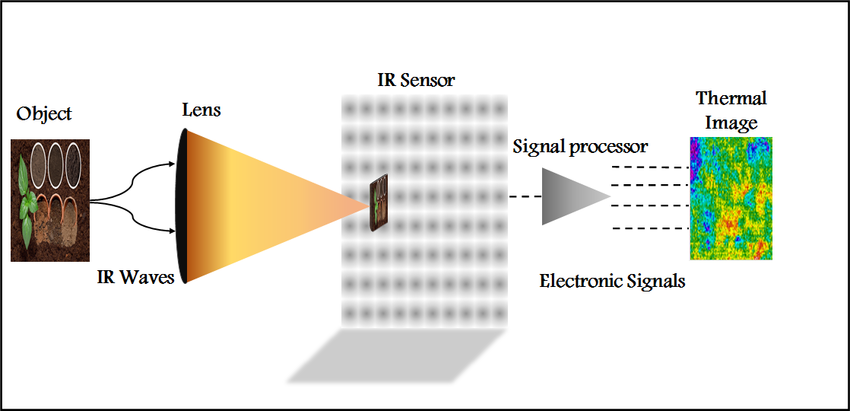
This enables users to instantly identify hot spots, cold spots, and subtle temperature patterns that are completely invisible to the eye.
Wiring Connections – DIY ESP32 Thermal Camera
Connect the components as follows:
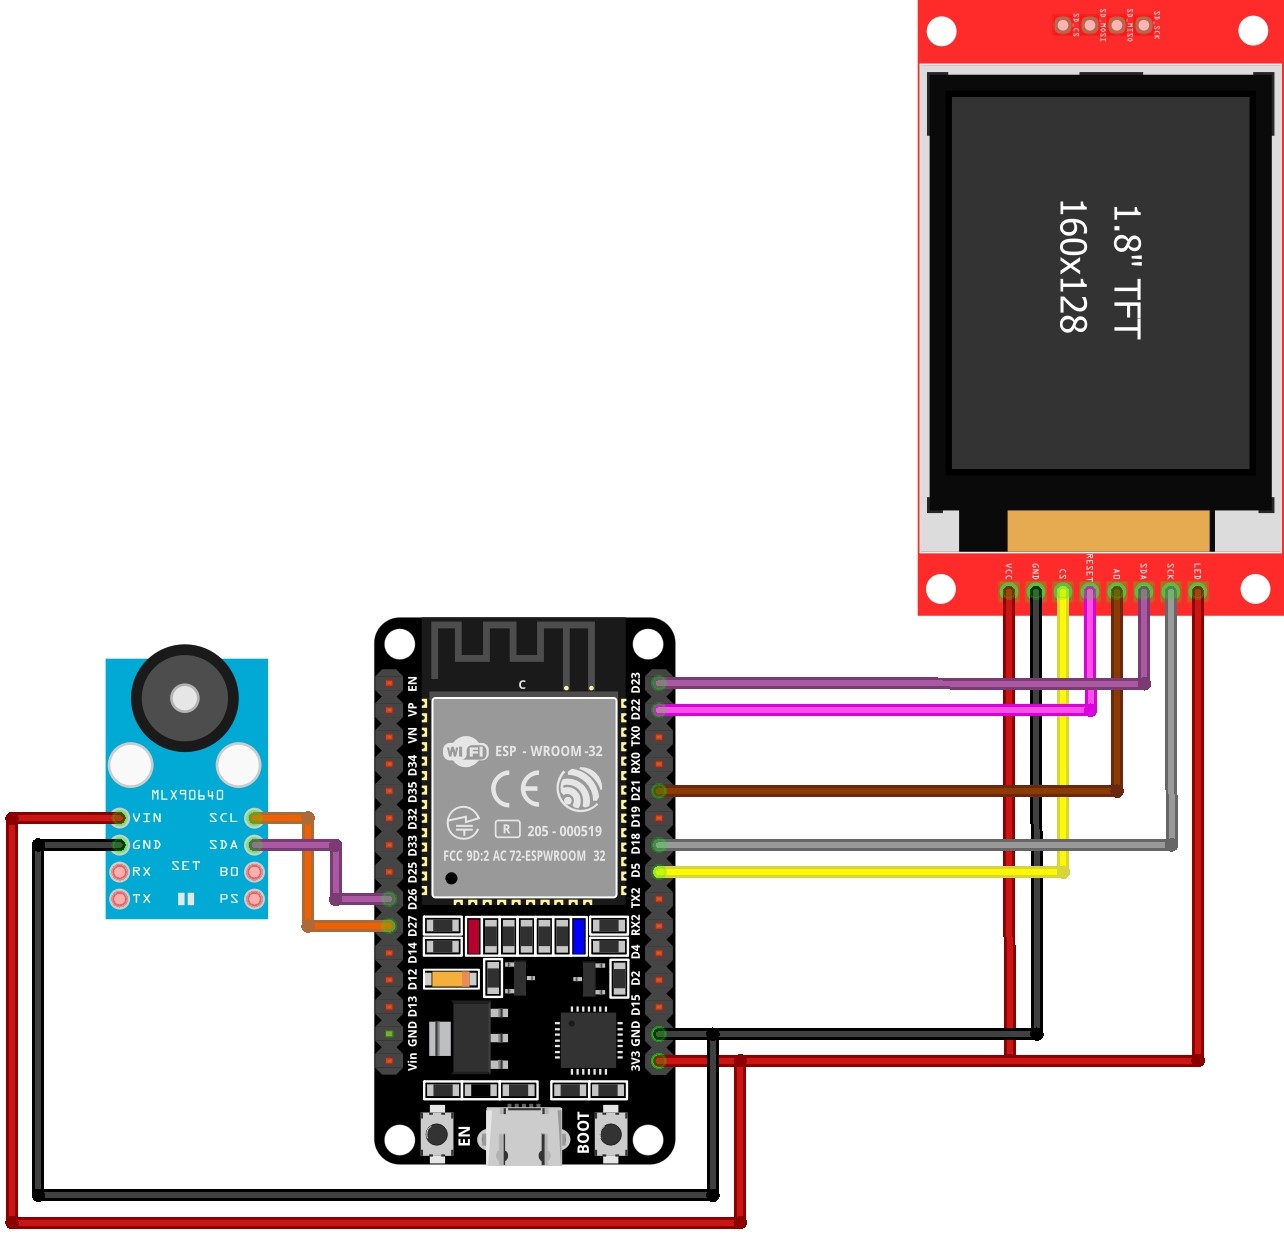
MLX90640 Thermal Camera (I2C):
- VCC → 3.3V
- GND → GND
- SDA → GPIO 26
- SCL → GPIO 27
ST7735 Display (SPI):
- VCC → 3.3V
- GND → GND
- CS → GPIO 5
- DC → GPIO 21
- RST → GPIO 22
- MOSI → GPIO 23
- SCLK → GPIO 18
- TFT LED/BLK (Backlight) -> ESP32 3.3V (for constant backlight)
Applications
This thermal camera has numerous applications:
- Home energy audits to detect insulation problems
- HVAC system diagnosis
- Electronics debugging (finding hot components)
- DIY medical screening (detecting elevated body temperatures)
- Security monitoring
- Wildlife observation
Set Up Your Arduino Environment
Install ESP32 Board Support:
Go to File > Preferences.
In the “Additional Boards Manager URLS” field, add: https://raw.githubusercontent.com/espressif/arduino-esp32/gh-pages/package_esp32_index.json.
Go to Tools > Board > Boards Manager…. Search for “esp32” and install the package by Espressif Systems.
Select your exact ESP32 board model from Tools > Board.
Install Required Libraries: You’ll need several libraries. Go to Sketch > Include Library > Manage Libraries… and install the following:
The code requires the following libraries for compilation.
MLX90640 Basic Example code
Copy the following code and upload the code to the ESP32 Board.
1 2 3 4 5 6 7 8 9 10 11 12 13 14 15 16 17 18 19 20 21 22 23 24 25 26 27 28 29 30 31 32 33 34 35 36 37 38 39 40 41 42 43 44 45 46 47 48 49 50 51 52 53 54 55 56 57 58 59 60 61 62 63 64 65 66 67 68 69 70 71 72 73 74 75 76 77 78 79 | /* * Basic MLX90640 Temperature Reader * * Simple code to read temperatures from MLX90640 thermal camera * and output to serial monitor * * Hardware: * - ESP32 * - MLX90640 IR Thermal Camera */ #include <Wire.h> #include <Adafruit_MLX90640.h> // Pin definitions #define I2C_SDA 26 #define I2C_SCL 27 // Initialize sensor Adafruit_MLX90640 mlx; // Frame buffer float frame[32 * 24]; void setup() { Serial.begin(115200); Serial.println("MLX90640 Basic Temperature Reader"); // Initialize I2C Wire.begin(I2C_SDA, I2C_SCL); // Initialize MLX90640 if (!mlx.begin(MLX90640_I2CADDR_DEFAULT, &Wire)) { Serial.println("MLX90640 not found! Check connections"); while (1) delay(10); } // Set basic configuration mlx.setResolution(MLX90640_ADC_18BIT); mlx.setRefreshRate(MLX90640_4_HZ); Serial.println("Sensor initialized. Starting readings..."); } void loop() { // Read frame from sensor if (mlx.getFrame(frame) == 0) { // Calculate some basic statistics float minTemp = 1000, maxTemp = -1000; float centerTemp = frame[32*12 + 16]; // Middle of the array // Find min/max temperature for (int i = 0; i < 32 * 24; i++) { if (!isnan(frame[i])) { minTemp = min(minTemp, frame[i]); maxTemp = max(maxTemp, frame[i]); } } // Print basic temperature info Serial.println("\n----- Temperature Data -----"); Serial.print("Center: "); Serial.print(centerTemp, 1); Serial.println("°C"); Serial.print("Min: "); Serial.print(minTemp, 1); Serial.println("°C"); Serial.print("Max: "); Serial.print(maxTemp, 1); Serial.println("°C"); } else { Serial.println("Error reading frame"); } // Wait before next reading delay(1000); } |
Output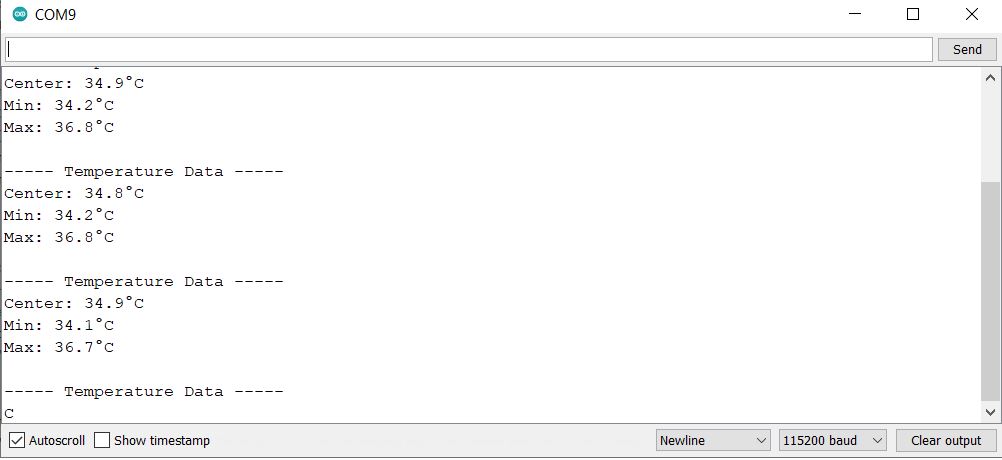
Source code – DIY ESP32 Thermal Camera with MLX90640 and ST7735 Display
Putting It All Together
The complete code provides a fully functional thermal camera with:
- An optimized 32×24 thermal array interpolated to a 96×76 display resolution
- Frame rate management targeting 5 FPS
- Temperature tracking for center point and hotspot
- Automatic or preset temperature ranges
- Clear visual interface with colour scale
You can customize this project in several ways:
- Temperature Ranges: Modify the preset temperature ranges for different designs
- Colour Scheme: Change the heatmap colours for different visualization styles
- Display Layout: Adjust the layout dimensions for different display sizes
- Interpolation Quality: Modify INTERP_COLS and INTERP_ROWS for different detail levels
1 2 3 4 5 6 7 8 9 10 11 12 13 14 15 16 17 18 19 20 21 22 23 24 25 26 27 28 29 30 31 32 33 34 35 36 37 38 39 40 41 42 43 44 45 46 47 48 49 50 51 52 53 54 55 56 57 58 59 60 61 62 63 64 65 66 67 68 69 70 71 72 73 74 75 76 77 78 79 80 81 82 83 84 85 86 87 88 89 90 91 92 93 94 95 96 97 98 99 100 101 102 103 104 105 106 107 108 109 110 111 112 113 114 115 116 117 118 119 120 121 122 123 124 125 126 127 128 129 130 131 132 133 134 135 136 137 138 139 140 141 142 143 144 145 146 147 148 149 150 151 152 153 154 155 156 157 158 159 160 161 162 163 164 165 166 167 168 169 170 171 172 173 174 175 176 177 178 179 180 181 182 183 184 185 186 187 188 189 190 191 192 193 194 195 196 197 198 199 200 201 202 203 204 205 206 207 208 209 210 211 212 213 214 215 216 217 218 219 220 221 222 223 224 225 226 227 228 229 230 231 232 233 234 235 236 237 238 239 240 241 242 243 244 245 246 247 248 249 250 251 252 253 254 255 256 257 258 259 260 261 262 263 264 265 266 267 268 269 270 271 272 273 274 275 276 277 278 279 280 281 282 283 284 285 286 287 288 289 290 291 292 293 294 295 296 297 298 299 300 301 302 303 304 305 306 307 308 309 310 311 312 313 314 315 316 317 318 319 320 321 322 323 324 325 326 327 328 329 330 331 332 333 334 335 336 337 338 339 340 341 342 343 344 345 346 347 348 349 350 351 352 353 354 355 356 357 358 359 360 361 362 363 364 365 366 367 368 369 370 371 372 373 374 375 376 377 378 379 380 381 382 383 384 385 386 387 388 389 390 391 392 393 394 395 396 397 398 399 400 401 402 403 404 405 406 407 408 409 410 411 412 413 414 415 416 417 418 419 420 421 422 423 424 425 426 427 428 429 430 431 432 433 434 435 436 437 438 439 440 441 442 443 444 445 446 447 448 449 450 451 452 453 454 455 456 457 458 459 460 461 462 463 464 465 466 467 468 469 470 471 472 473 474 475 476 477 478 479 480 481 482 483 484 485 486 487 488 489 490 491 492 493 494 495 496 497 498 499 500 501 502 503 504 505 506 507 508 509 510 511 512 513 514 515 516 517 518 519 | /* * **Optimized ESP32 MLX90640 Thermal Camera with ST7735 Display** * * Key features: * - Improved image quality with enhanced interpolation * - Optimized frame rate with smart update strategy * - Reduced memory footprint * - More accurate temperature readings with better filtering * - Cleaner UI with better temperature visualization * * Hardware: * - ESP32 * - MLX90640 IR Thermal Camera * - ST7735 1.8" TFT Display (160x128 resolution) */ #include <Wire.h> #include <SPI.h> #include <Adafruit_GFX.h> #include <Adafruit_ST7735.h> #include <Adafruit_MLX90640.h> #include <cmath> #include <algorithm> // Define missing color constants #define ST7735_DARKGREY 0x7BEF #define ST7735_GREY 0xC618 // Pin definitions #define I2C_SDA 26 #define I2C_SCL 27 #define TFT_CS 5 #define TFT_DC 21 #define TFT_RST 22 #define TFT_MOSI 23 #define TFT_SCLK 18 // Display setup #define DISPLAY_WIDTH 160 #define DISPLAY_HEIGHT 128 #define HEADER_HEIGHT 12 #define FOOTER_HEIGHT 20 #define SCALE_WIDTH 12 #define PADDING 2 // Image area dimensions #define IMAGE_WIDTH (DISPLAY_WIDTH - SCALE_WIDTH - 2*PADDING) #define IMAGE_HEIGHT (DISPLAY_HEIGHT - HEADER_HEIGHT - FOOTER_HEIGHT - 2*PADDING) #define IMAGE_X PADDING #define IMAGE_Y (HEADER_HEIGHT + PADDING) // Temperature ranges enum TempRange { BODY = 0, ROOM = 1, OUTDOOR = 2, AUTO = 3 }; // Initialize hardware Adafruit_MLX90640 mlx; Adafruit_ST7735 tft = Adafruit_ST7735(TFT_CS, TFT_DC, TFT_MOSI, TFT_SCLK, TFT_RST); // Thermal data float frame[32 * 24]; // Current frame float prevFrame[32 * 24]; // Previous frame for filtering bool badPixels[32 * 24] = {false}; // Interpolation settings - higher resolution for better image quality #define INTERP_COLS 96 #define INTERP_ROWS 76 // Temperature tracking float minTemp = 20.0, maxTemp = 40.0; float prevMinTemp = 20.0, prevMaxTemp = 40.0; int centerX = 32 / 2, centerY = 24 / 2; float centerTemp = 0.0, prevCenterTemp = 0.0; int hotspotX = -1, hotspotY = -1; float hotspotTemp = -100.0, prevHotspotTemp = -100.0; // Performance tracking unsigned long frameTimer = 0; float fps = 0.0, fpsSmoothed = 0.0; unsigned long lastFullUpdate = 0; unsigned long lastFrameTime = 0; int frameCount = 0; bool needsFullUpdate = true; // Settings TempRange currentTempRange = AUTO; const unsigned long FULL_UPDATE_INTERVAL = 3000; // Force full update every 3 seconds const unsigned long TARGET_FRAME_TIME = 200; // Target 5 FPS const float TEMP_ALPHA = 0.7; // Temporal filter strength const float RANGE_SMOOTH = 0.3; // Temperature range smoothing // Enhanced color palette (Blue -> Cyan -> Green -> Yellow -> Orange -> Red) const uint16_t heatmap[] = { 0x001F, 0x021F, 0x041F, 0x061F, 0x081F, 0x0A1F, // Dark blue to blue 0x0A5F, 0x0A9F, 0x0ADF, 0x0AFF, 0x0AFD, 0x0AF8, // Blue to cyan 0x0AF0, 0x0EF0, 0x1EF0, 0x2EF0, 0x3EF0, 0x5EF0, // Cyan to green 0x7EF0, 0x9EF0, 0xBEF0, 0xDEF0, 0xFEF0, 0xFEC0, // Green to yellow 0xFE80, 0xFE40, 0xFE00, 0xFD00, 0xFC00, 0xFA00, // Yellow to orange 0xF800, 0xF000, 0xE800, 0xE000, 0xD800, 0xD000 // Orange to red }; #define NUM_COLORS (sizeof(heatmap) / sizeof(heatmap[0])) // Function prototypes void initDisplay(); void displayError(const char *message); void showStartupScreen(); void processThermalData(); float getPreviousOrNeighborValue(int idx); void updateTempRange(); bool checkForSignificantChanges(); uint16_t getColorFromTemp(float temp); void drawFullFrame(); void updateDynamicElements(); void drawHeader(); void drawThermalImage(); void drawCrosshair(int x, int y, uint16_t color); float bilinearInterpolation(float x, float y); void drawTemperatureScale(); void drawFooter(); void updateFooterTemperatures(); void setup() { Serial.begin(115200); // Initialize I2C with higher clock for better performance Wire.begin(I2C_SDA, I2C_SCL); Wire.setClock(800000); // Use 800kHz for better performance // Initialize MLX90640 Serial.println("Initializing MLX90640..."); if (!mlx.begin(MLX90640_I2CADDR_DEFAULT, &Wire)) { Serial.println("MLX90640 not found!"); initDisplay(); displayError("MLX90640 NOT FOUND\nCheck wiring..."); while (1) delay(10); } // Configure sensor for higher performance mlx.setResolution(MLX90640_ADC_18BIT); mlx.setRefreshRate(MLX90640_8_HZ); // Initialize display initDisplay(); showStartupScreen(); delay(1000); // Initialize frame buffers for (int i = 0; i < 768; i++) { prevFrame[i] = (minTemp + maxTemp) / 2; } frameTimer = millis(); lastFullUpdate = millis(); lastFrameTime = millis(); } void loop() { unsigned long currentTime = millis(); // Maintain stable frame rate unsigned long elapsed = currentTime - lastFrameTime; if (elapsed < TARGET_FRAME_TIME) { delay(TARGET_FRAME_TIME - elapsed); currentTime = millis(); } lastFrameTime = currentTime; // Read thermal data if (mlx.getFrame(frame) == 0) { // Process frame processThermalData(); updateTempRange(); // Determine update strategy bool significantChange = checkForSignificantChanges(); if (significantChange || (currentTime - lastFullUpdate > FULL_UPDATE_INTERVAL)) { needsFullUpdate = true; lastFullUpdate = currentTime; } // Update display if (needsFullUpdate) { drawFullFrame(); needsFullUpdate = false; } else { updateDynamicElements(); } } else { Serial.println("Failed to get frame"); } // Calculate FPS float instantFPS = 1000.0 / (millis() - frameTimer); fpsSmoothed = fpsSmoothed * 0.8 + instantFPS * 0.2; frameTimer = millis(); frameCount++; } void initDisplay() { tft.initR(INITR_BLACKTAB); tft.setRotation(3); // Landscape tft.fillScreen(ST7735_BLACK); tft.setTextWrap(false); } void displayError(const char *message) { tft.fillScreen(ST7735_BLACK); tft.setCursor(10, DISPLAY_HEIGHT / 2 - 10); tft.setTextColor(ST7735_RED); tft.setTextSize(1); tft.println(message); } void showStartupScreen() { tft.fillScreen(ST7735_BLACK); tft.setTextColor(ST7735_WHITE); tft.setTextSize(1); // Title int titleX = (DISPLAY_WIDTH - 84) / 2; tft.setCursor(titleX, 30); tft.println("THERMAL CAMERA"); tft.setCursor(30, 60); tft.println("MLX90640 + ESP32"); tft.setCursor(30, 90); tft.println("Initializing..."); } void processThermalData() { hotspotTemp = -100; hotspotX = -1; hotspotY = -1; // Detect bad pixels and find hotspot for (int i = 0; i < 768; i++) { // Check for invalid readings if (isnan(frame[i]) || frame[i] < -40 || frame[i] > 300) { badPixels[i] = true; frame[i] = getPreviousOrNeighborValue(i); } else { badPixels[i] = false; // Track hotspot if (frame[i] > hotspotTemp) { hotspotTemp = frame[i]; hotspotX = i % 32; hotspotY = i / 32; } } // Apply temporal filtering frame[i] = TEMP_ALPHA * frame[i] + (1.0 - TEMP_ALPHA) * prevFrame[i]; prevFrame[i] = frame[i]; } // Update center temperature int centerIdx = centerY * 32 + centerX; centerTemp = frame[centerIdx]; } float getPreviousOrNeighborValue(int idx) { // First try to use previous value if (!isnan(prevFrame[idx])) { return prevFrame[idx]; } // Otherwise use average of surrounding pixels int x = idx % 32; int y = idx / 32; float sum = 0; int count = 0; for (int dy = -1; dy <= 1; dy++) { for (int dx = -1; dx <= 1; dx++) { if (dx == 0 && dy == 0) continue; int nx = x + dx; int ny = y + dy; if (nx >= 0 && nx < 32 && ny >= 0 && ny < 24) { int nidx = ny * 32 + nx; if (!badPixels[nidx] && !isnan(frame[nidx])) { sum += frame[nidx]; count++; } } } } return (count > 0) ? (sum / count) : prevFrame[idx]; } void updateTempRange() { // Apply preset ranges if selected switch (currentTempRange) { case BODY: minTemp = 25.0; maxTemp = 40.0; return; case ROOM: minTemp = 15.0; maxTemp = 30.0; return; case OUTDOOR: minTemp = 0.0; maxTemp = 50.0; return; case AUTO: break; // Continue with auto-ranging } // Auto-ranging using percentile method float temps[768]; int validCount = 0; for (int i = 0; i < 768; i++) { if (!badPixels[i] && frame[i] >= -40 && frame[i] <= 300) { temps[validCount++] = frame[i]; } } if (validCount > 20) { std::sort(temps, temps + validCount); // Use 5% and 95% percentiles for robust range int lowerIdx = validCount * 0.05; int upperIdx = validCount * 0.95; float newMin = temps[lowerIdx]; float newMax = temps[upperIdx]; // Ensure minimum range span if (newMax - newMin < 5.0) { float mid = (newMax + newMin) / 2; newMin = mid - 2.5; newMax = mid + 2.5; } // Smooth transition to new range minTemp = minTemp * (1.0 - RANGE_SMOOTH) + newMin * RANGE_SMOOTH; maxTemp = maxTemp * (1.0 - RANGE_SMOOTH) + newMax * RANGE_SMOOTH; } } bool checkForSignificantChanges() { bool centerChanged = fabs(centerTemp - prevCenterTemp) > 0.5; bool rangeChanged = fabs(minTemp - prevMinTemp) > 0.5 || fabs(maxTemp - prevMaxTemp) > 0.5; bool hotspotChanged = (hotspotX != -1 && fabs(hotspotTemp - prevHotspotTemp) > 0.5); prevCenterTemp = centerTemp; prevMinTemp = minTemp; prevMaxTemp = maxTemp; prevHotspotTemp = hotspotTemp; return centerChanged || rangeChanged || hotspotChanged || (frameCount % 5 == 0); } uint16_t getColorFromTemp(float temp) { temp = constrain(temp, minTemp, maxTemp); float normalized = (temp - minTemp) / (maxTemp - minTemp); int colorIndex = round(normalized * (NUM_COLORS - 1)); return heatmap[constrain(colorIndex, 0, NUM_COLORS - 1)]; } void drawFullFrame() { tft.fillScreen(ST7735_BLACK); drawHeader(); drawThermalImage(); drawTemperatureScale(); drawFooter(); } void updateDynamicElements() { // Update FPS tft.fillRect(DISPLAY_WIDTH - 40, 2, 40, 10, ST7735_BLACK); tft.setTextColor(ST7735_WHITE); tft.setTextSize(1); tft.setCursor(DISPLAY_WIDTH - 40, 2); tft.print(fpsSmoothed, 1); tft.print(" FPS"); // Update temperature values updateFooterTemperatures(); } void drawHeader() { tft.fillRect(0, 0, DISPLAY_WIDTH, HEADER_HEIGHT, ST7735_BLACK); tft.setTextColor(ST7735_WHITE); tft.setTextSize(1); tft.setCursor(2, 2); tft.print("MLX90640 Thermal"); tft.setCursor(DISPLAY_WIDTH - 40, 2); tft.print(fpsSmoothed, 1); tft.print(" FPS"); } void drawThermalImage() { // Calculate pixel size and image position int pixelWidth = IMAGE_WIDTH / INTERP_COLS; int pixelHeight = IMAGE_HEIGHT / INTERP_ROWS; pixelWidth = max(pixelWidth, 1); pixelHeight = max(pixelHeight, 1); int actualWidth = pixelWidth * INTERP_COLS; int actualHeight = pixelHeight * INTERP_ROWS; int offsetX = IMAGE_X + (IMAGE_WIDTH - actualWidth) / 2; int offsetY = IMAGE_Y + (IMAGE_HEIGHT - actualHeight) / 2; // Draw image border tft.drawRect(offsetX - 1, offsetY - 1, actualWidth + 2, actualHeight + 2, ST7735_GREY); // Draw thermal image with bilinear interpolation for (int y = 0; y < INTERP_ROWS; y++) { for (int x = 0; x < INTERP_COLS; x++) { float originalX = (float)x * 31.0 / (INTERP_COLS - 1); float originalY = (float)y * 23.0 / (INTERP_ROWS - 1); float temp = bilinearInterpolation(originalX, originalY); uint16_t color = getColorFromTemp(temp); tft.fillRect(offsetX + x * pixelWidth, offsetY + y * pixelHeight, pixelWidth, pixelHeight, color); } } // Draw center crosshair int displayCenterX = offsetX + (centerX * INTERP_COLS / 32.0) * pixelWidth; int displayCenterY = offsetY + (centerY * INTERP_ROWS / 24.0) * pixelHeight; drawCrosshair(displayCenterX, displayCenterY, ST7735_WHITE); // Draw hotspot marker if (hotspotX >= 0 && hotspotY >= 0) { int displayHotspotX = offsetX + (hotspotX * INTERP_COLS / 32.0) * pixelWidth; int displayHotspotY = offsetY + (hotspotY * INTERP_ROWS / 24.0) * pixelHeight; drawCrosshair(displayHotspotX, displayHotspotY, ST7735_RED); } } void drawCrosshair(int x, int y, uint16_t color) { tft.drawLine(x - 3, y, x + 3, y, color); tft.drawLine(x, y - 3, x, y + 3, color); tft.drawRect(x - 1, y - 1, 3, 3, color); } float bilinearInterpolation(float x, float y) { int x1 = floor(x); int y1 = floor(y); int x2 = min(x1 + 1, 31); int y2 = min(y1 + 1, 23); float xFrac = x - x1; float yFrac = y - y1; // Get pixel values at the four corners float tl = frame[y1 * 32 + x1]; float tr = frame[y1 * 32 + x2]; float bl = frame[y2 * 32 + x1]; float br = frame[y2 * 32 + x2]; // Bilinear interpolation formula float top = tl * (1 - xFrac) + tr * xFrac; float bot = bl * (1 - xFrac) + br * xFrac; return top * (1 - yFrac) + bot * yFrac; } void drawTemperatureScale() { int scaleX = DISPLAY_WIDTH - SCALE_WIDTH; int scaleY = IMAGE_Y; int scaleHeight = IMAGE_HEIGHT; // Draw color gradient for (int y = 0; y < scaleHeight; y++) { float t = 1.0 - (float)y / scaleHeight; int colorIndex = t * (NUM_COLORS - 1); colorIndex = constrain(colorIndex, 0, NUM_COLORS - 1); tft.drawFastHLine(scaleX, scaleY + y, SCALE_WIDTH - 2, heatmap[colorIndex]); } // Draw scale border tft.drawRect(scaleX - 1, scaleY - 1, SCALE_WIDTH, scaleHeight + 2, ST7735_WHITE); // Draw temperature markers tft.setTextColor(ST7735_WHITE); tft.setTextSize(1); char tempStr[8]; // Max temp sprintf(tempStr, "%d°C", (int)round(maxTemp)); tft.setCursor(scaleX - 20, scaleY); tft.print(tempStr); // Mid temp sprintf(tempStr, "%d°C", (int)round((minTemp + maxTemp) / 2)); tft.setCursor(scaleX - 20, scaleY + scaleHeight/2 - 4); tft.print(tempStr); // Min temp sprintf(tempStr, "%d°C", (int)round(minTemp)); tft.setCursor(scaleX - 20, scaleY + scaleHeight - 8); tft.print(tempStr); } void drawFooter() { tft.fillRect(0, DISPLAY_HEIGHT - FOOTER_HEIGHT, DISPLAY_WIDTH, FOOTER_HEIGHT, ST7735_BLACK); tft.drawFastHLine(0, DISPLAY_HEIGHT - FOOTER_HEIGHT, DISPLAY_WIDTH, ST7735_GREY); updateFooterTemperatures(); } void updateFooterTemperatures() { tft.fillRect(0, DISPLAY_HEIGHT - FOOTER_HEIGHT + 2, DISPLAY_WIDTH, FOOTER_HEIGHT - 2, ST7735_BLACK); tft.setTextSize(1); // Center temperature tft.setTextColor(ST7735_WHITE); tft.setCursor(4, DISPLAY_HEIGHT - FOOTER_HEIGHT + 4); tft.print("Center:"); tft.setTextColor(ST7735_CYAN); tft.print(centerTemp, 1); tft.print("C"); // Hotspot temperature tft.setTextColor(ST7735_WHITE); tft.setCursor(4, DISPLAY_HEIGHT - FOOTER_HEIGHT + 14); tft.print("Hotspot:"); tft.setTextColor(ST7735_RED); tft.print(hotspotTemp, 1); tft.print("C"); } |
Upload and Run
Connect your ESP32 board to your computer via USB. Click the “Upload”.
Once uploaded, the ESP32 should reset, and you should see the startup screen on the display, followed by the live thermal image!
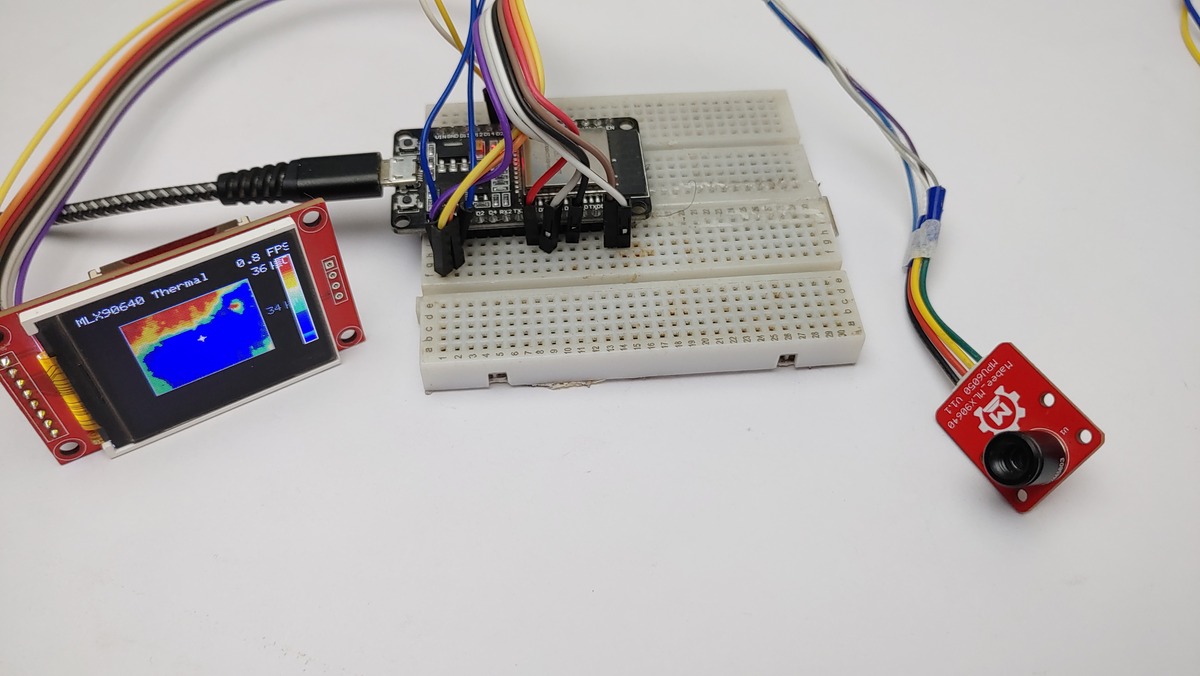
Understanding the Display
Header: Shows the project title and the real-time Frames Per Second (FPS).
Main Area (Left): The thermal image. Warmer areas will be towards the red end of the spectrum, cooler areas towards the blue.
White Crosshair: Marks the center pixel(s) of the sensor’s view.
Red Crosshair: Marks the hottest detected pixel (hotspot) in the current frame.
Scale (Right): A vertical colour bar showing the mapping from colour to temperature. The maximum and minimum temperatures. This range adjusts automatically.
Footer: Displays the numerical temperature readings (in Celsius):
Center: Temperature at the white crosshair.
Hotspot: Temperature at the red crosshair.
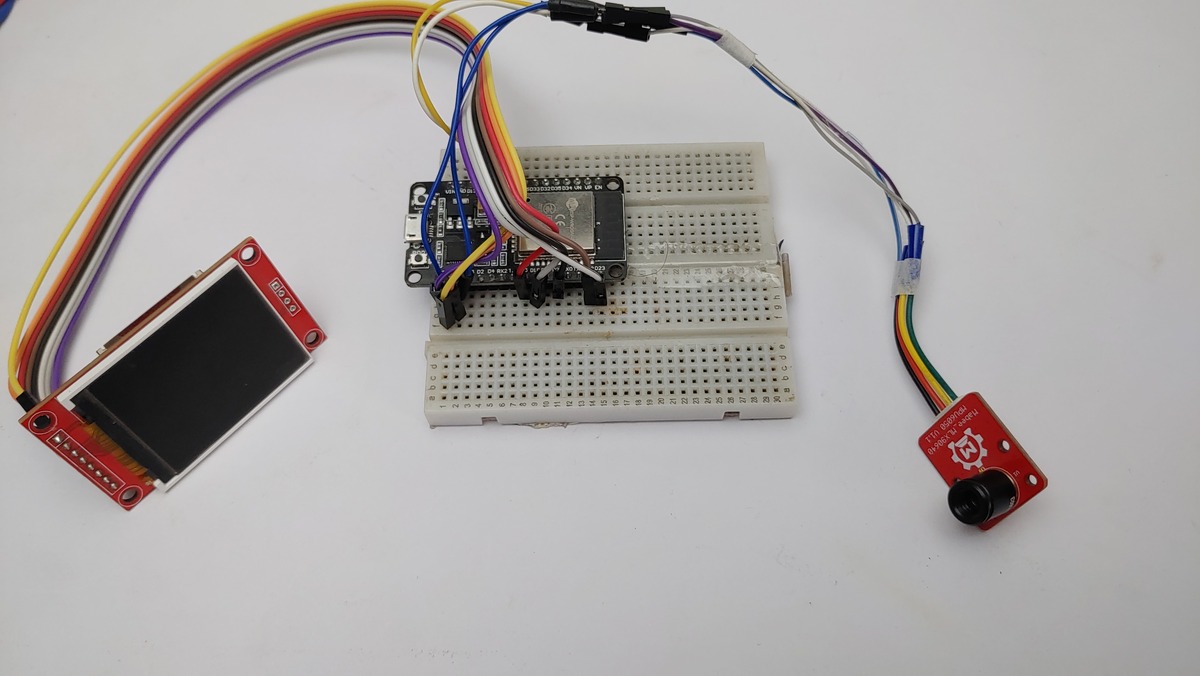
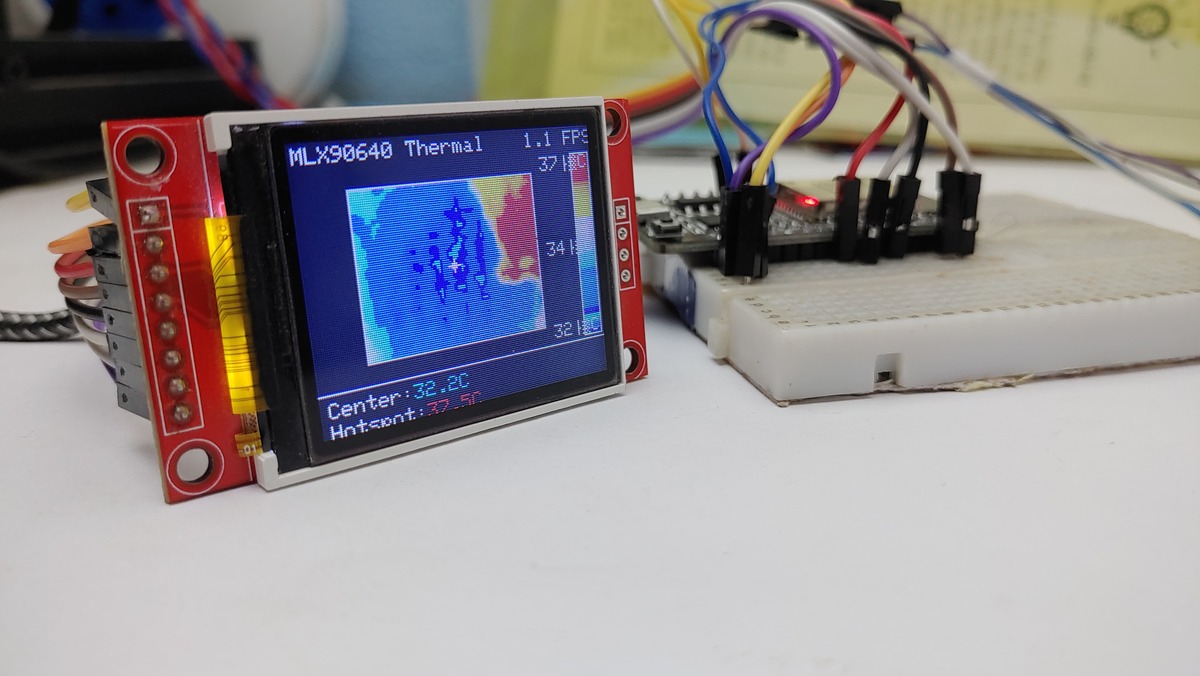
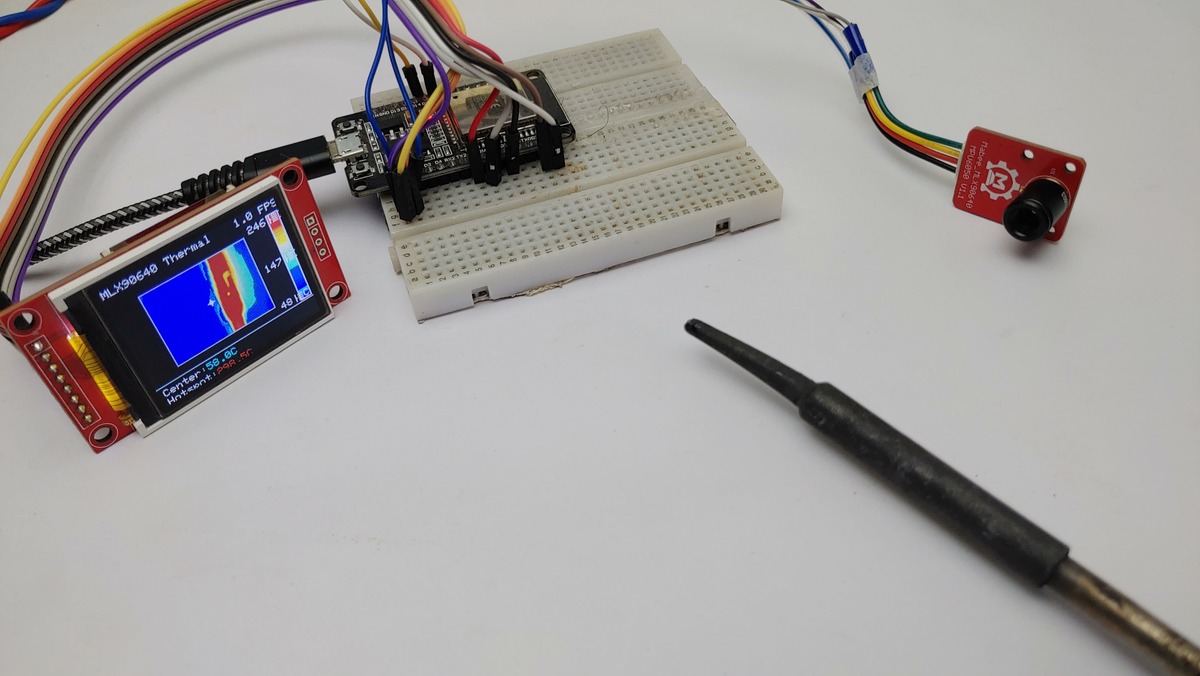
Testing the MLX90640-Based DIY Thermal Camera
Now the device is ready for testing. The colour of the LED Screen changes based on the temperature.
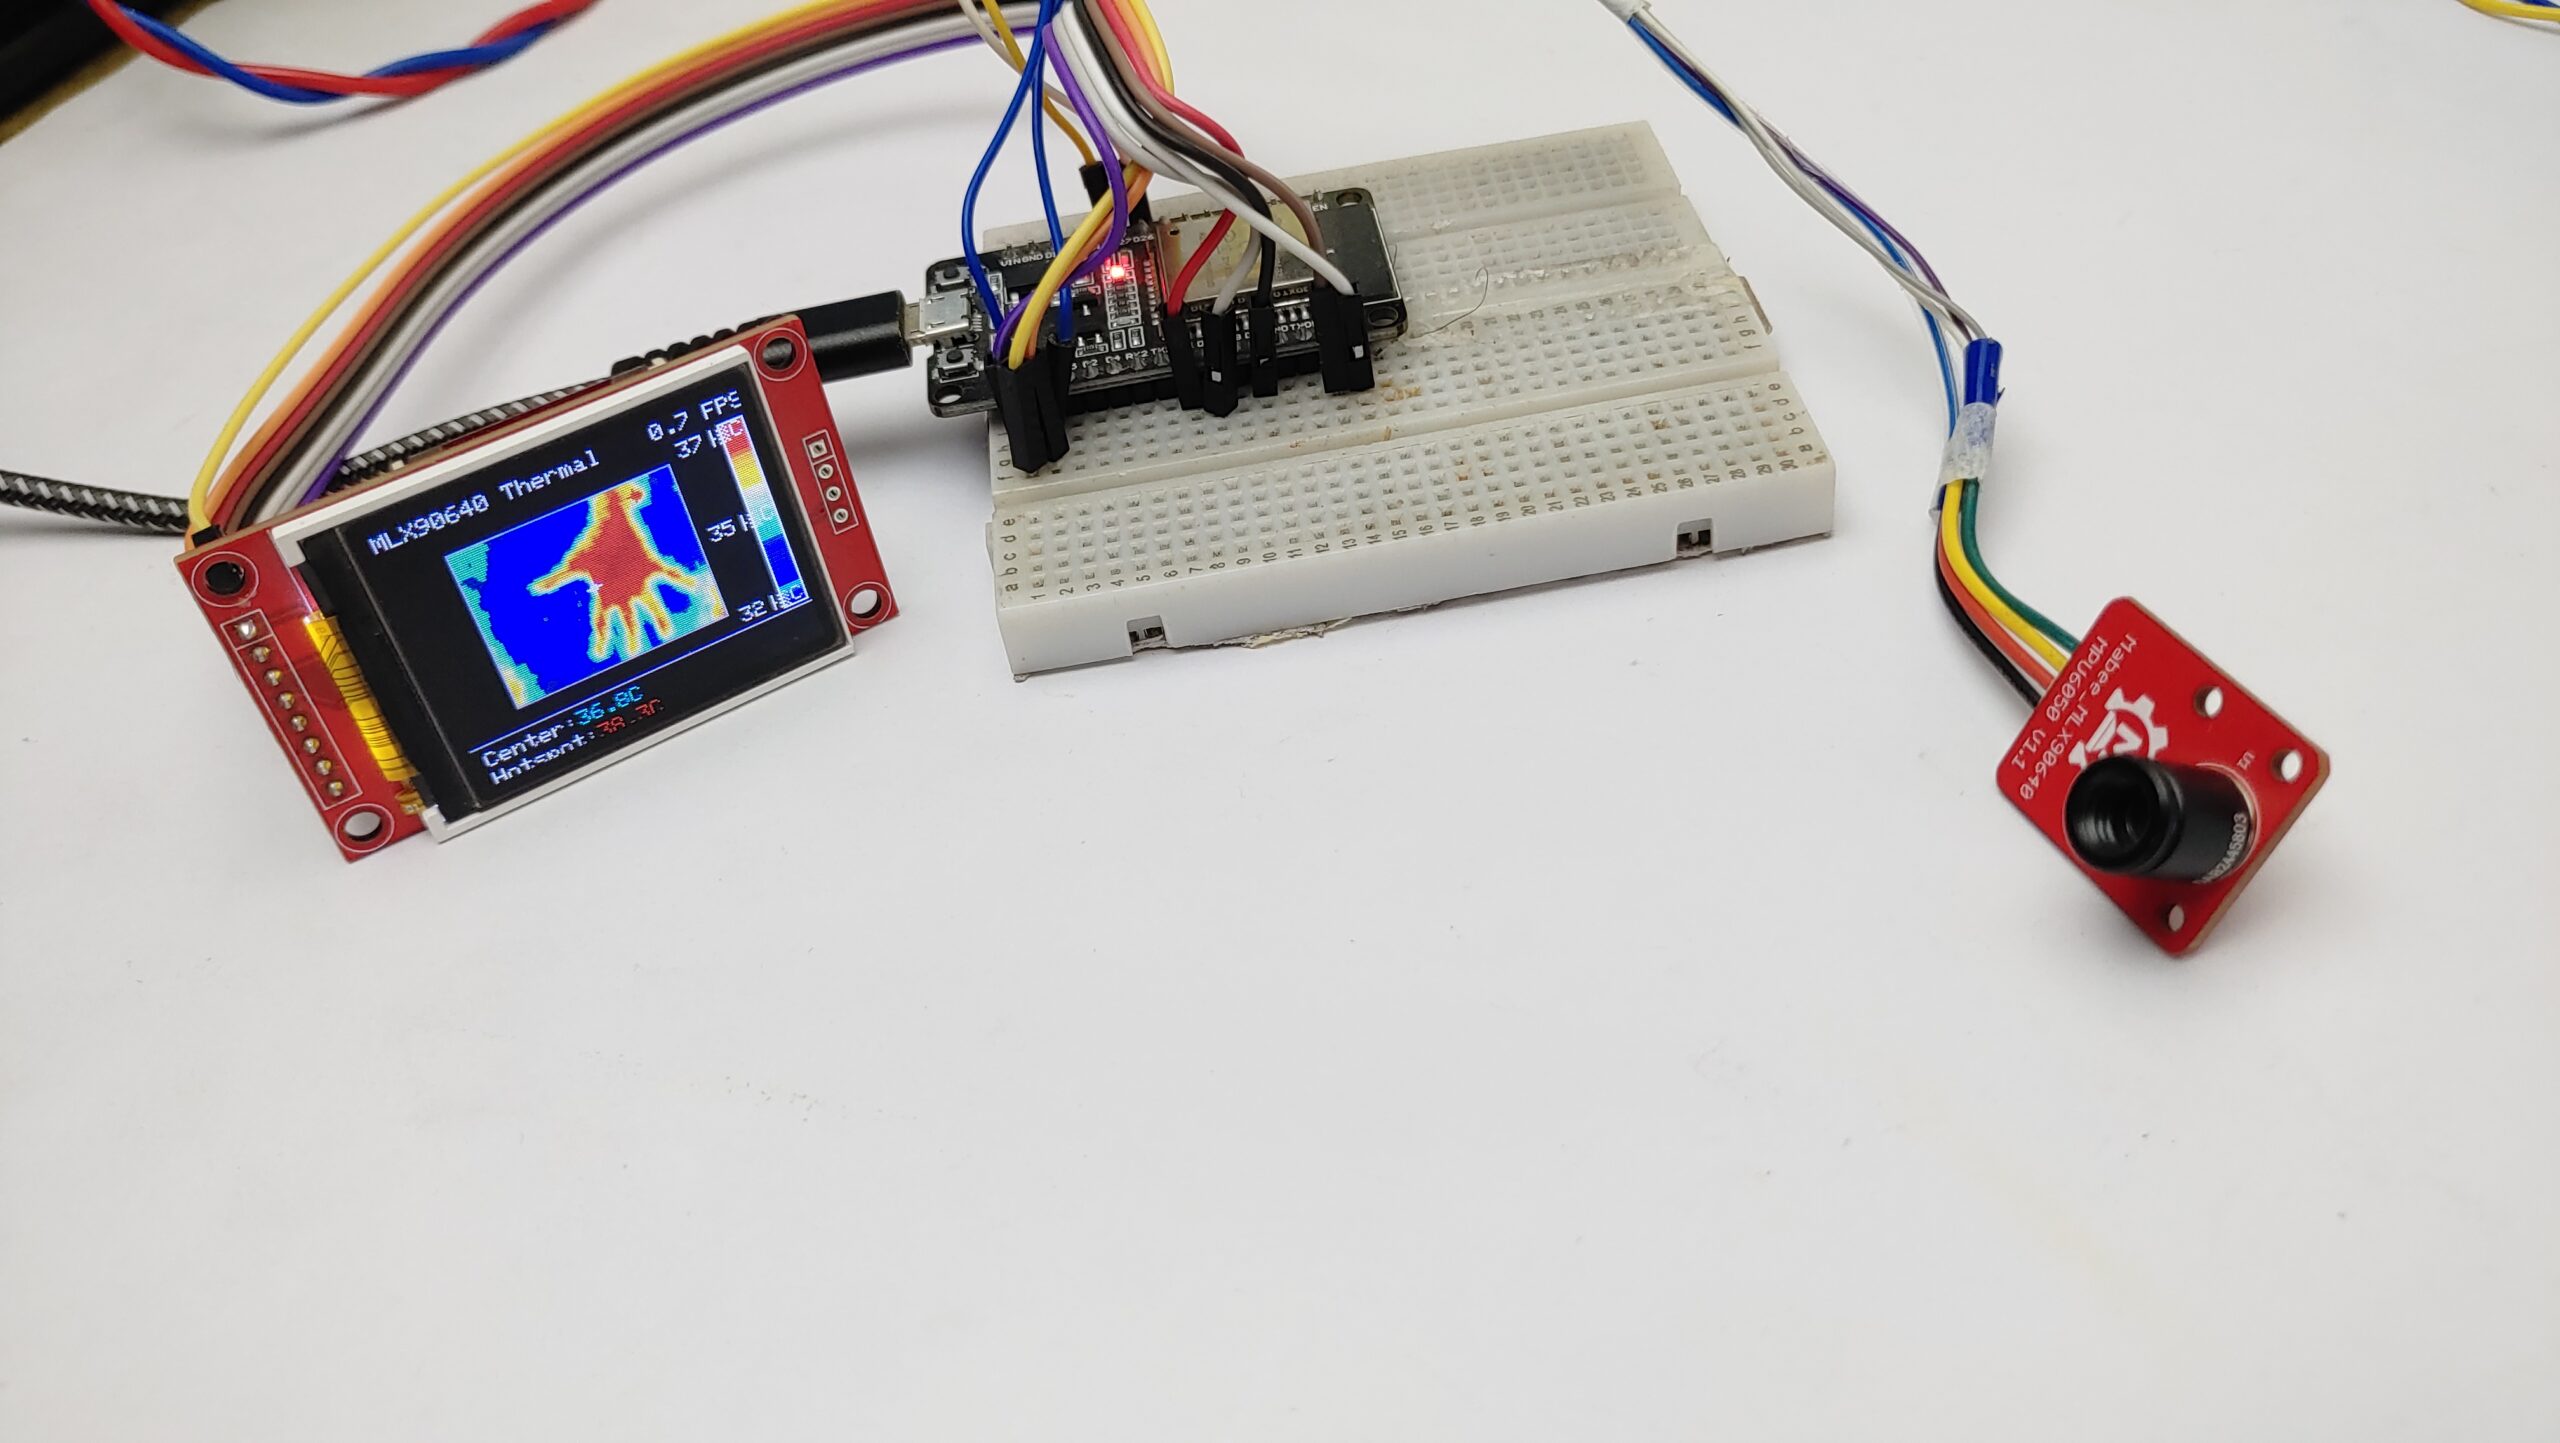
I am introducing a hot soldering iron and observing the temperature and change in the thermal image.
Without a Soldering Iron

In conclusion, this ESP32-based thermal camera offers an affordable and portable solution for different thermal imaging applications.. This cost-effective project is accessible to anyone with basic electronics knowledge, and the optimized code ensures smooth operation and high-quality thermal visualization, making it suitable for hobbyists, makers, and professionals alike, providing an excellent entry point into thermal imaging applications.
")

")


1 Comment
Great Tutorial , can we make a thermal tracking sentry gun