")
The Unihiker K10 is an ESP32-S3-based AI development board designed specifically for STEM education and AI learning, electronics, combining powerful ESP32-S3 processing with built-in artificial intelligence capabilities in one compact, beginner-friendly package. Developed by DFRobot.
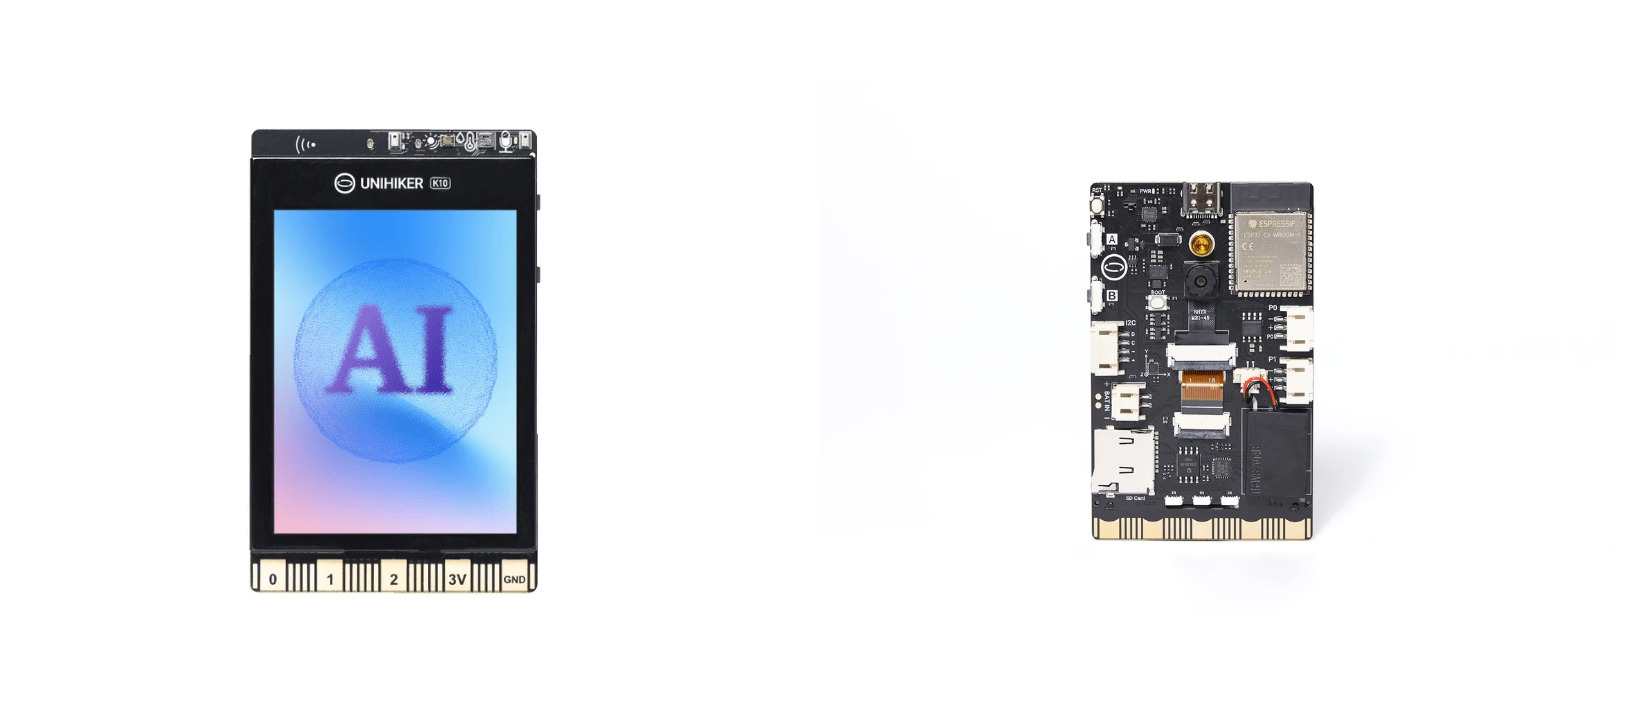 This compact everything you need for AI projects, IoT applications, and interactive learning in a single device. Unlike traditional development boards that require multiple external components, the K10 comes with built-in sensors, display, camera, and AI capabilities. Getting Started with the Arduino Nano 33 BLE Sense Rev2
This means you can start building AI-powered projects immediately without the complexity of wiring circuits or hunting for compatible components.
Whether you’re:
a student learning their first steps in embedded programming,
a hobbyist curious about AI projects, or
an educator looking for an all-in-one teaching platform,
…the K10 gives you a ready-to-go playground for AI and IoT.
Technical Specifications

- MCU: ESP32-S3 Xtensa LX7
- SRAM: 512KB
- Flash: 16MB
- Wi-Fi: 2.4G
- BT: Bluetooth 5.0
- Screen: 2.8 inch, 240×320
- Camera: 2MP
- Sensor: Button, Microphone, Temperature Sensor, Humidity Sensor, Light Sensor, Accelerometer Sensor
- Actuator: RGB Lights, Speaker
- Pre-Installed AI models:
Face Detection
Image Recognition
Cat/Dog Detection
QR Code Recognition
Motion Detection
Local Speech Recognition
Custom Voice Commands - Power: USB Type-C, Battery Port, Edge Connector
👉 In short, you get a complete mini-lab on a single board—display, vision, audio, sensors, and expansion options.
Onboard storage expansion: microSD (FAT32). The docs recommend quality 32 GB cards, formatted FAT32, for stable logging and media use
How the K10’s Pins Actually Work
On the UNIHIKER K10, the pins you see on the edge connector don’t connect directly to the ESP32-S3 chip. Instead, they go through an XL9535 I²C-to-GPIO expander. This design choice keeps costs down and simplifies the PCB layout, but it has important implications:
What this means for your projects:
- Digital input/output works perfectly
- PWM and basic analog reading are supported
- High-speed protocols like SPI won’t work on expansion pins
- I2C devices are your best choice for advanced sensors
Why this design makes sense: The ESP32-S3’s native GPIO pins are already busy handling the display, camera, audio system, and onboard sensors. The I2C expander provides additional pins while maintaining a compact and affordable design.
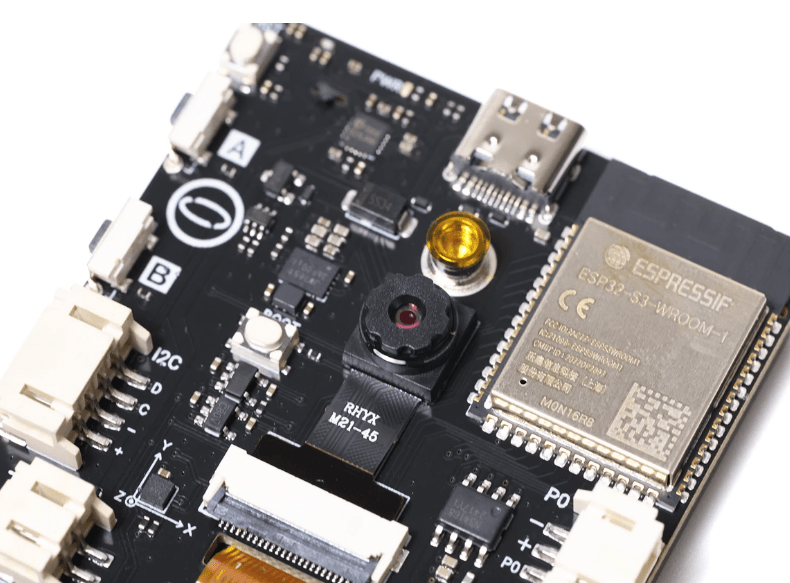
UNIHIKER K10 Hardware Overview
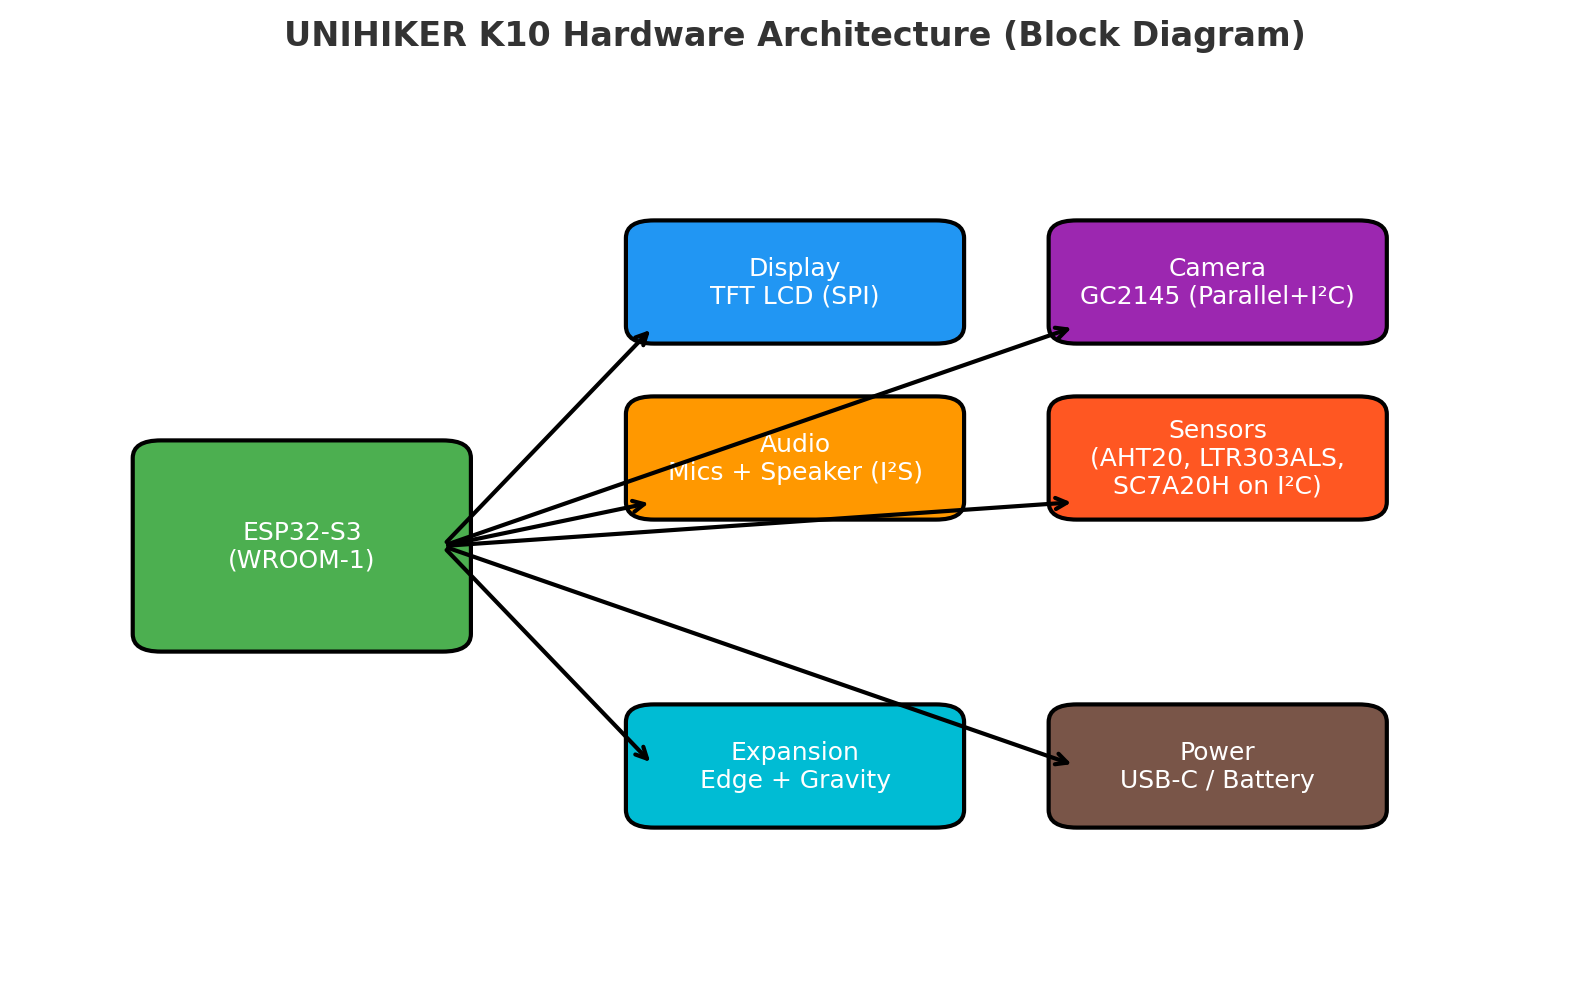
Display (TFT LCD)
Type: 2.8″ TFT LCD with ILI9341 controller
Connections:
SPI → LCD_SCLK, LCD_DC, LCD_CS, LCD_MOSI
Backlight → LCD_BLK
Reset → LCD_RST
RGB LEDs
Quantity: 3 × WS2812B addressable RGB LEDs
Connections:
Data line → PORGB
Power → 3.3 V
Chained DIN → DO
Audio System
- Microphones: MSM381ACT001 analog mics → ES7243E ADC (I²S)
- Connections: I²S (I2S_BCLK, I2S_LRCK, I2S_SDO)
- Speaker: NS4168 amplifier (up to 2 W, I²S-driven)
Camera Module
- Sensor: GC2145 (2 MP)
- Interface: Parallel bus (D2…D9, VSYNC, HREF, PCLK, XCLK)
- Control: I²C (SCL=P19, SDA=P20)
Onboard Sensors
- AHT20: Temp & humidity (I²C 0x38)
- LTR-303ALS-01: Ambient light (I²C 0x29)
- SC7A20H: 3-axis accelerometer (I²C 0x19)
Buttons
- BTN-A: P5
- BTN-B: P11
- BOOT Button: GPIO0 (flashing mode)
Power Management
- Inputs: USB-C (VBUS), PH2.0 battery connector (3.0–6.0 V)
- Voltage Rails: 3.3 V (main), 2.8 V, and 1.8 V (peripherals/camera)
What the K10 Can Handle
Now that we’ve explored the hardware, let’s see how actually to start coding the K10. The K10 is purpose-built for TinyML (Tiny Machine Learning), enabling it to run AI tasks directly on the device. Getting Started with Edge Impulse on Arduino Nano 33 BLE Sense Rev2
This means it excels at:
- Small computer vision models (96×96 pixel images)
- Keyword spotting and voice commands
- Sensor data classification
- Basic gesture recognition
The board comes pre-loaded with AI models for face detection, pet recognition, QR code scanning, and voice commands – perfect for demonstrating real-world applications before diving into custom development.
The 8MB PSRAM provides sufficient memory for camera frames and AI model inference, while the 16MB Flash storage holds your programs and trained models.
Getting Started with the Unihiker K10 ESP32 AI Development Board
What’s in the Box
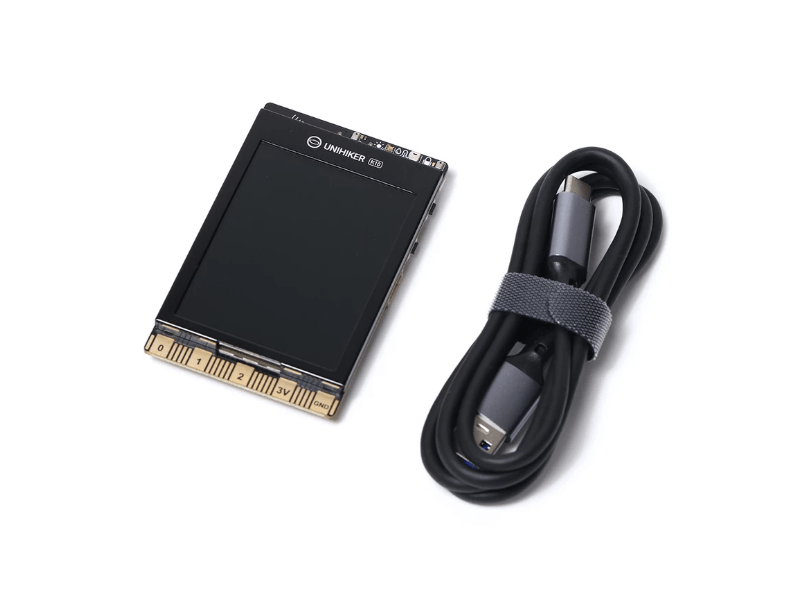
- UNIHIKER K10 development board
- USB Type-C cable
- Quick start guide
Initial Setup
Power Up: Connect the USB-C cable to your computer
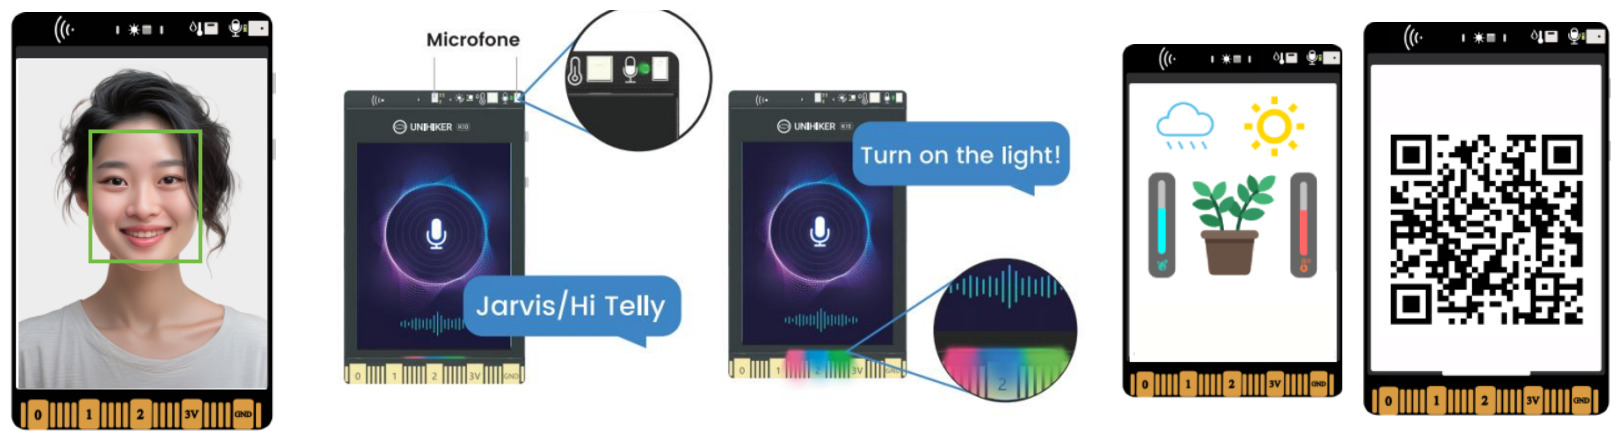
- Explore Factory Demos: Press Button B to cycle through different modes:
- Face detection with the camera
- Voice commands (try saying “Hi Telly” followed by “turn on the light”)
- Sensor readings and interactive displays
- Access Documentation: Use the QR code feature to quickly access online tutorials
Programming Environment Options
Mind+ (Visual Programming – Windows Only)
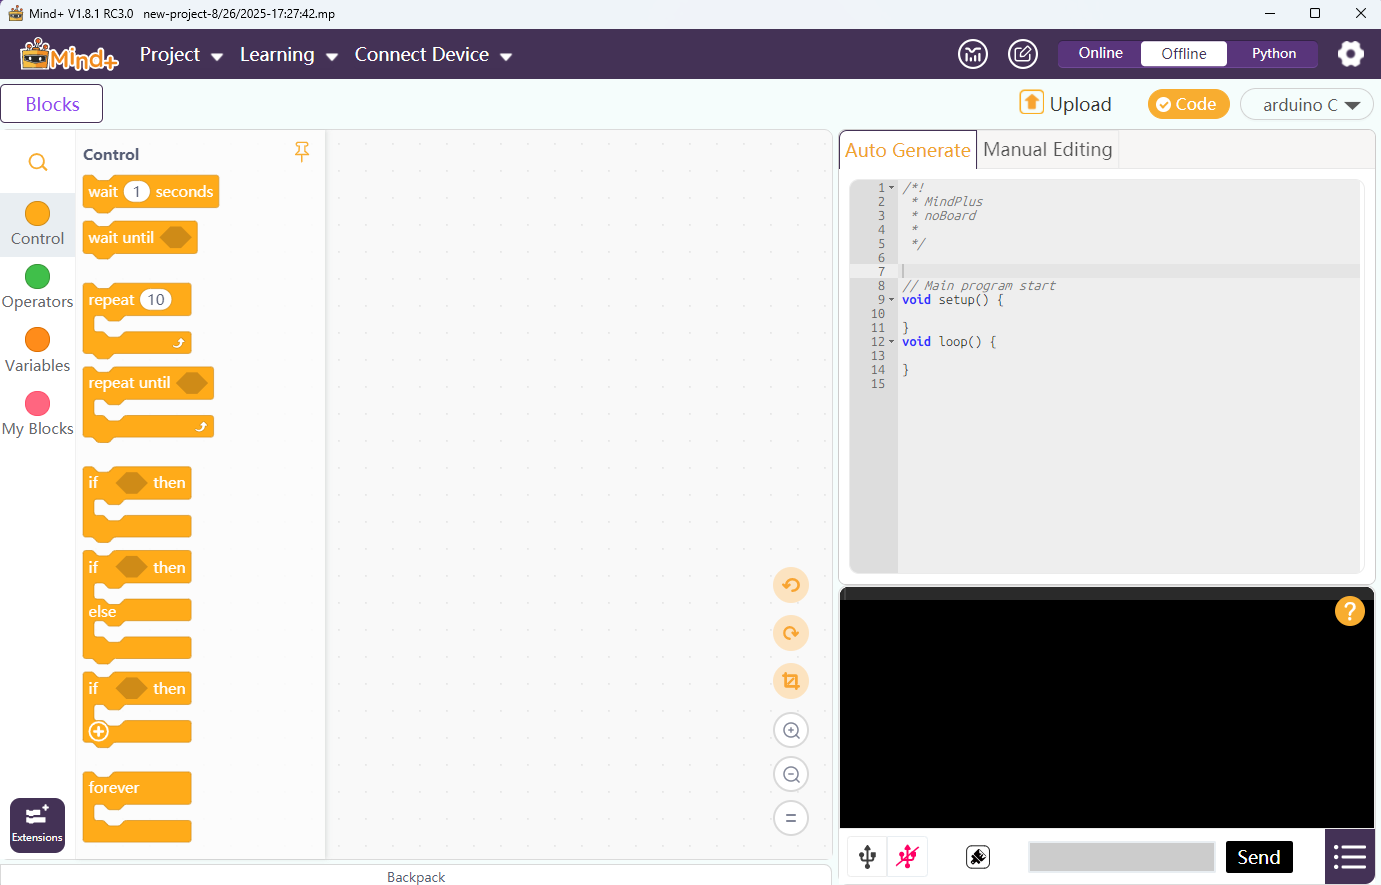
A drag-and-drop coding tool that generates Python automatically.
Best for: Beginners, classroom demos, quick prototypes
Setup:
Download Mind+ v1.8.1+ from the DFRobot website
Switch to Offline Mode
Go to Extensions → Board → UNIHIKER K10
Connect with USB-C → Connect Device
Drag blocks → Upload
Limitation: Currently supports Windows only. Mac/Linux users should use MicroPython or Arduino.
MicroPython
Write Python code with full access to K10 hardware libraries.
Best for: Flexible development, real-time interaction, cross-platform coding
Setup:
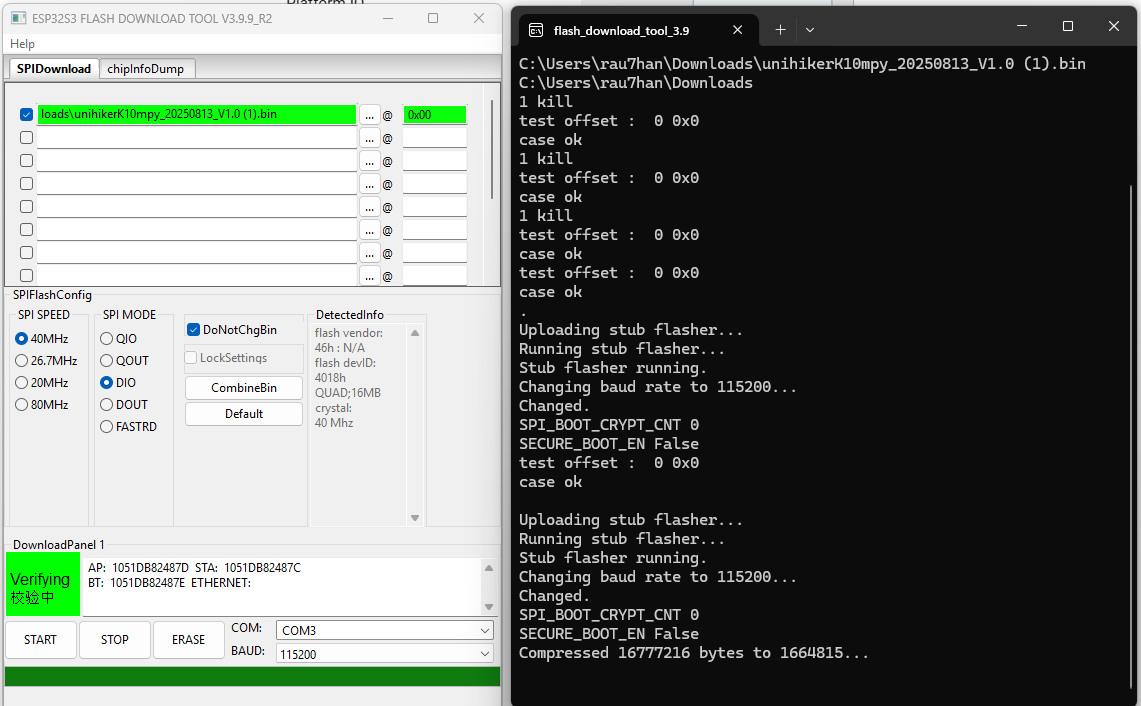
Flash MicroPython firmware to the K10
Windows: Flash Download Tool and Micropython Firmware K10
Install Thonny IDE
Select the ESP32 device in Thonny
Save the code below as
main.pyto run on the board
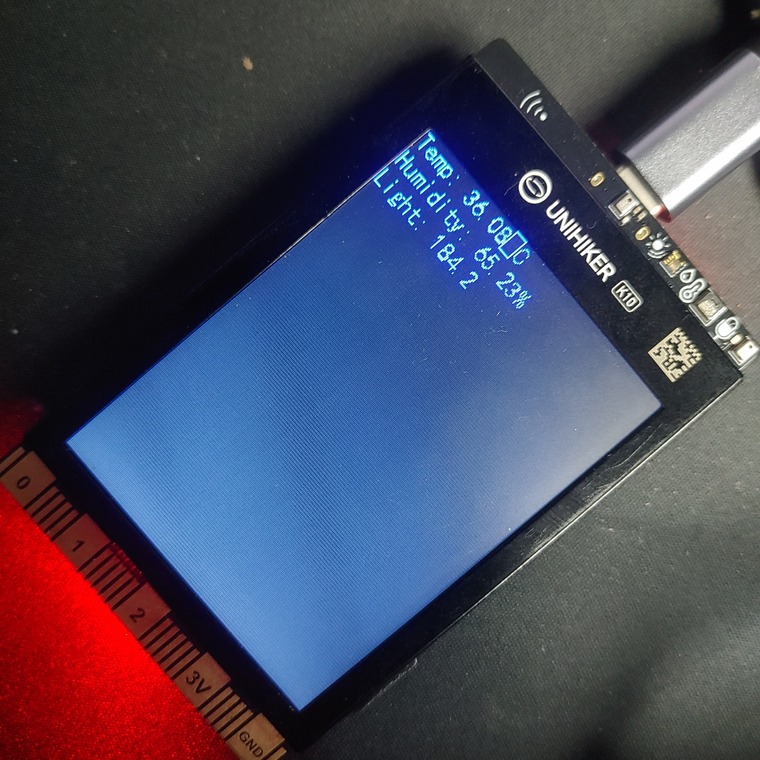
This code reads temperature, humidity, and light data from UniHiker sensors and displays them on the screen.
It also uses an RGB LED to show temperature status: red for hot, blue for cold, and green for comfortable.
The loop updates the display and LED every second.
1 2 3 4 5 6 7 8 9 10 11 12 13 14 15 16 17 18 19 20 21 22 23 24 25 26 27 | from unihiker_k10 import screen, temp_humi, light, rgb import time # Initialize display screen.init() while True: # Read sensor data temperature = temp_humi.read_temp() humidity = temp_humi.read_humi() light_level = light.read() # Display on screen screen.draw_text(f"Temp: {temperature}°C", line=0) screen.draw_text(f"Humidity: {humidity}%", line=1) screen.draw_text(f"Light: {light_level}", line=2) # Color-code temperature with RGB LED if temperature > 30: rgb.write(0, 255, 0, 0) # Red for hot elif temperature < 15: rgb.write(0, 0, 0, 255) # Blue for cold else: rgb.write(0, 0, 255, 0) # Green for comfortable screen.show_draw() time.sleep(1) |
After running this code, you will see temperature, humidity, and light intensity
Key Library Example:
1 | from unihiker_k10 import screen, temp_humi, light, rgb, camera |
Arduino IDE (C/C++ Programming)
Classic Arduino development with access to the full ESP32 ecosystem.
Best for: Performance-critical apps, custom AI/TinyML models, advanced hardware interfacing
Setup:
Install Arduino IDE
Add Board Manager URL:
1 | https://downloadcd.dfrobot.com.cn/UNIHIKER/package_unihiker_index.json |
Go to Tools → Boards Manager → Search “UNIHIKER” → Install
Select the UNIHIKER K10 board and upload your program


")

